Learn how to download and install Stable Diffusion Ai software Automatic1111 on Windows in this step-by-step guide. Also, check out system requirements and frequently asked questions.

Stable Diffusion is an AI image generator that is free to use and can be run locally on your own computer if it meets the system requirements.
It’s a powerful algorithm that is easiest to use with a GUI (graphical user interface) such as Automatic1111.
Automatic1111 is a popular open-source UI tool for Stable Diffusion that is frequently updated and has many advanced features.
Follow the tutorial below, and you’ll soon be able to generate your own AI images!
- Note: Learn how Stable Diffusion works; the linked article explains it in simpler terms.
- See my tests on how to generate unique ai-images, unlike anyone else’s.
- Also, check out 40+ things Stable Diffusion can be used for.
You can also follow my video tutorial below:

System and Hardware Requirements for Stable Diffusion
Though you can run Stable Diffusion on your laptop if you want, the more powerful your computer – the faster and more enjoyable your Ai generation will be.
Stable Diffusion was developed to be processed on Nvidia GPUs, but it can also run on AMD or Intel GPUs, though it won’t be as easy to install or run as fast.
The speed at which you generate ai images mostly depends on your GPU, so check yours and upgrade if you have issues or get serious about ai generated images.
Stable Diffusion Minimum Requirements:
- Graphics card GPU: 4GB Minimum VRAM (though I suggest 8GB minimum).
- Processor CPU: 4-core will suffice, though you can go with a weaker one.
- RAM: 8GB will do, but might cause memory issues.
- Windows 10 or higher.
- Storage: 10GB minimum for installing everything, but I suggest closer to 200GB for all other ai models and your generated images.
My Stable Diffusion System Setup:
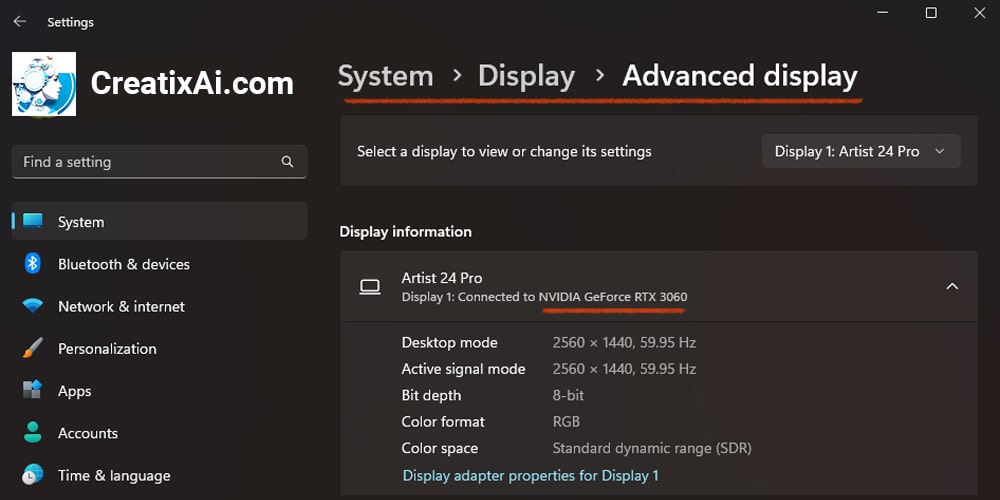
- GPU: 12GB (NVIDIA GeForce RTX 3060)
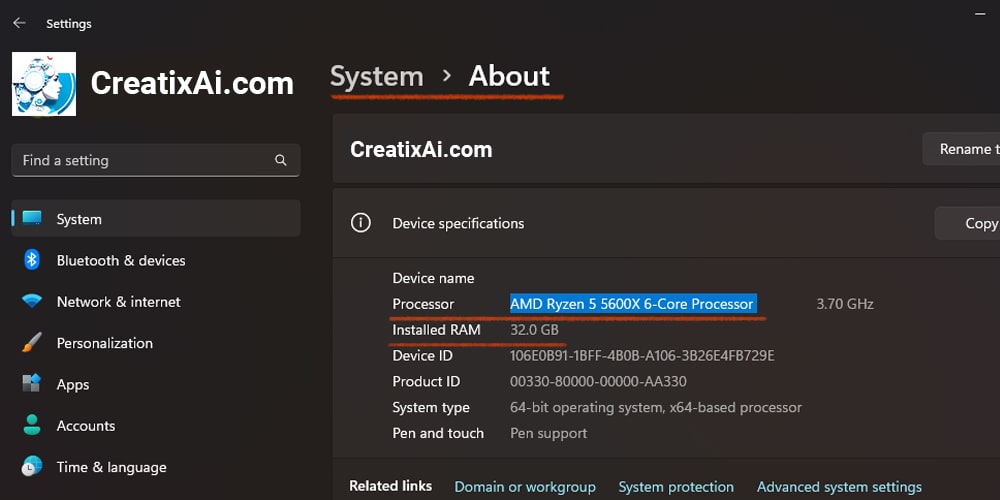
- CPU: 6-core (AMD Ryzen 5 5600X 6-Core Processor)
- RAM: 32GB
- Windows 11
- Storage: 2TB
Note: I didn’t start with this setup, but because I am generating a lot of ai images, I’ve upgraded over time. I find this new PC build to be very enjoyable and fast.
How to check GPU in Windows?
- Select Settings > System.
- Select Display and scroll down to Related settings.
- Select Advanced display. Your GPU’s make and model should be shown under Display information.
- Click Display Adapter Properties and look for a number next to the Dedicated Video Memory to see how much VRAM your GPU has.
How to check CPU and RAM in Windows?
- Select Settings > System.
- Select About and look for Device Specification.
Stable Diffusion Installation Steps
Follow the five steps below to install stable diffusion on windows.
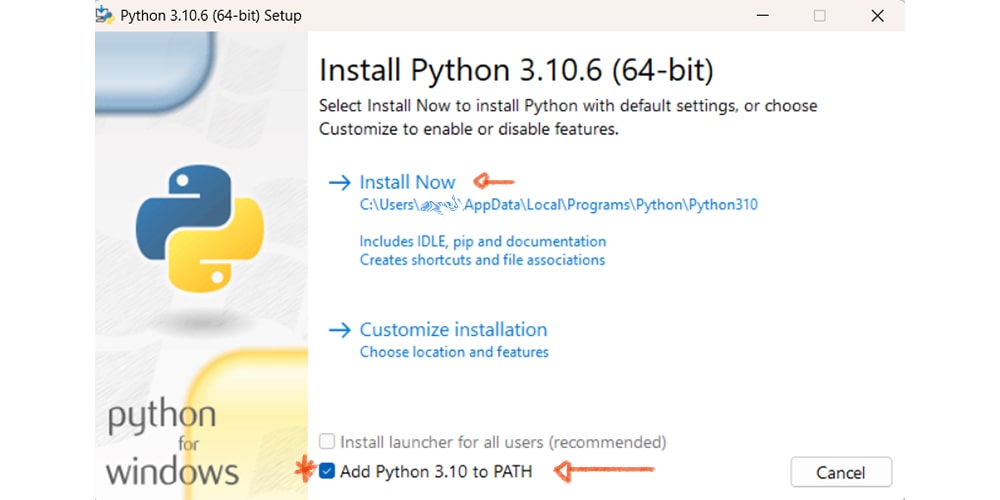
Step 1: Install Python
You need to install Python to run stable diffusion locally. Do not install the latest Python version, as it may not work.
I use and recommend Python version 3.10.6.
- Click the link above, scroll to the “Files” section, and download Windows Installer.
- Open the installer.
- IMPORTANT: Select “Add Python 3.10 to PATH”
- Click “Install Now”
- Wait until finished.
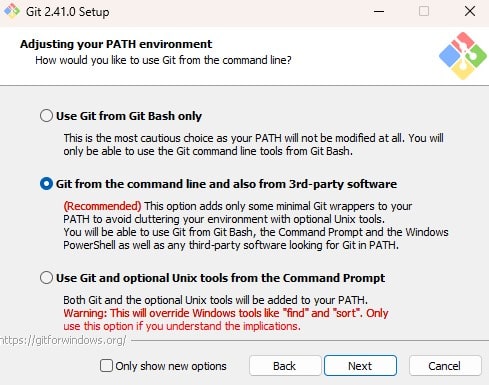
Step 2: Install Git
Git is a code repository management system. We will need it to set up and update Automatic1111.
- Go to their official Git for Windows page and download the installer.
- Open the installer, and go through the settings.
- Make sure the option “Git from the command line and also from 3rd-party software” is selected.
- Installing git – wait until the setup is finished.
Step 3: Clone Web-Ui Automatic1111
This is the longest step, but follow along, and you will do great!
- Create a new folder named “Stable Diffusion” (or whatever you want) anywhere on your computer. Remember, you will need at least 10GB of space, so choose accordingly.
- Click on its path, and it will be selected. Type “cmd” and hit enter.
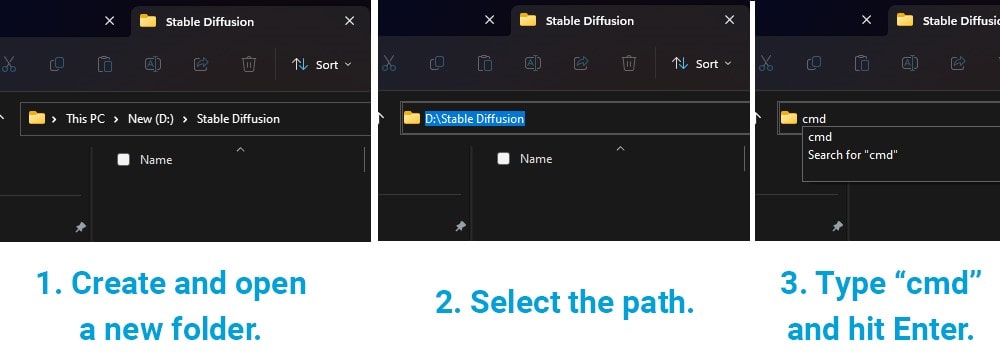
- Go to the Automatic1111 GitHub page and copy the code.
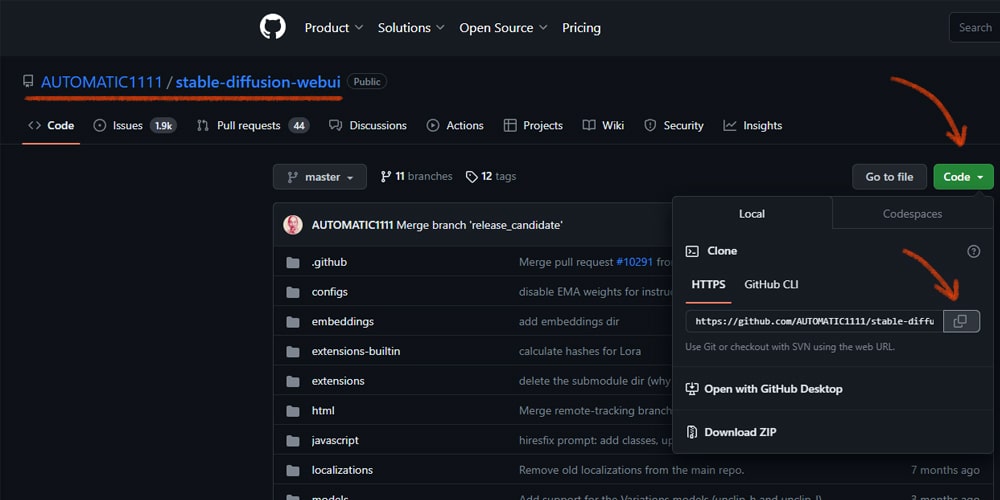
- Return to the command prompt we opened in Step 2 and type “git clone”, then paste the code you copied.git clone https://github.com/AUTOMATIC1111/stable-diffusion-webui.git
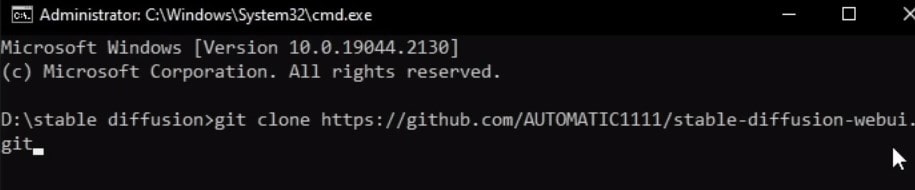
- Your newly created folder will populate with files that you need to run stable diffusion. It will take some time, so be patient.
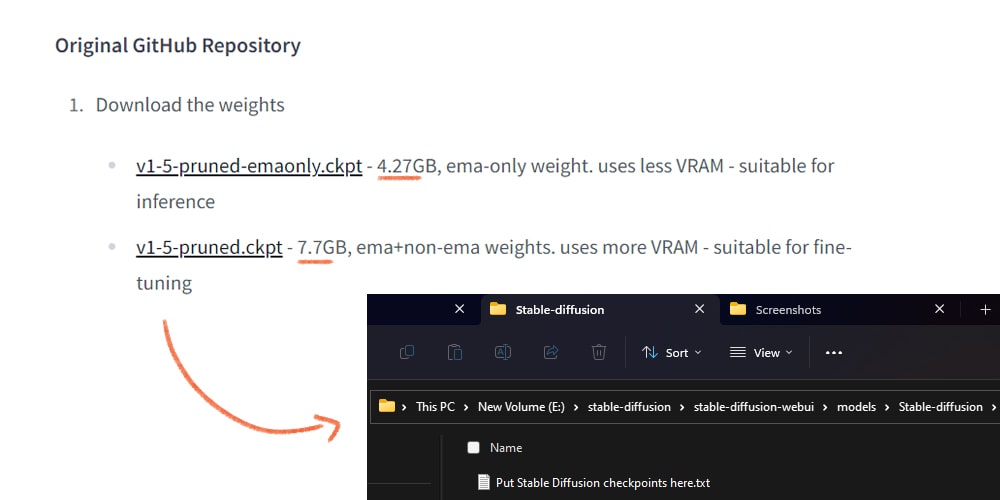
Step 4: Download Stable Diffusion Model
You are almost ready to run stable diffusion locally. You just need to download the actual model file that will generate the ai images.
You can download Stable Diffusion 1.5 Model from Hugging Face.
Or, download the newer SDXL model, that’s much improved from the one above! Read more about installing Stable Diffusion XL 1.0 and some prompt ideas here.
- Download one of the two versions.
- Go to your new folder > stable-diffusion-webui > models > Stable-diffusion
- Move the downloaded Stable Diffusion model to the location above.
It might take some time, depending on your internet speed, but you are almost there!
You can also download other unique Stable Diffusion checkpoints that are pre-trained for different purposes. The best place to find new ai models is Civitai. All the models there are free to download and play with.
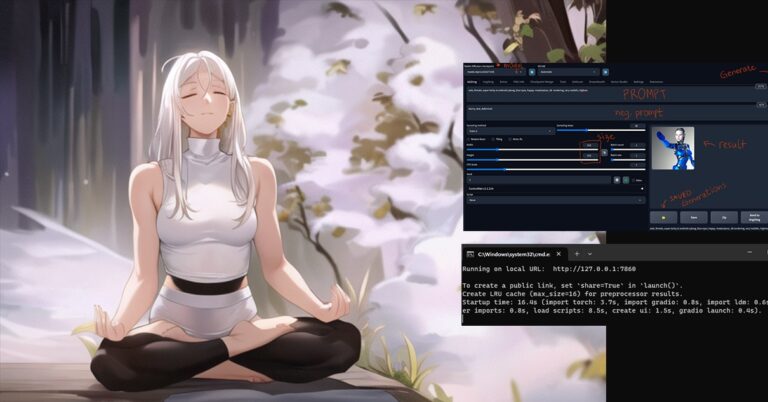
Step 5: Run Stable Diffusion
All your hard work has paid off, and you are ready to run Stable Diffusion!
- Go to your new folder > stable-diffusion-webui
- Find a file named “webui-user.bat”
- Run it
The first time you run it, the process will take 5-10 minutes to set everything up, so give it time. Afterward, it should only take a minute.
You will know when everything is done once you see a URL: Running on local URL: http://127.0.0.1:7860
Note: It’s ok if it looks like it’s not doing anything. Still, give it time (unless it has been way longer than expected).
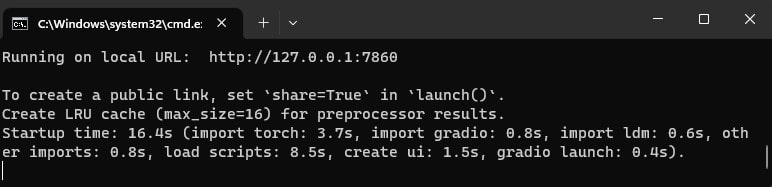
Now, go to that URL in your browser and you will see the Automatic1111 user interface.
Now you can have some real fun!
If you are new:
- In the top left corner, you should see the model you downloaded, and that’s also where you can change your models.
- Check out Automatic1111 features guide to get started if you want.
- Learn about what makes a good prompt.
- Check out Automatic1111 extensions.
- There’s so much to learn and explore!
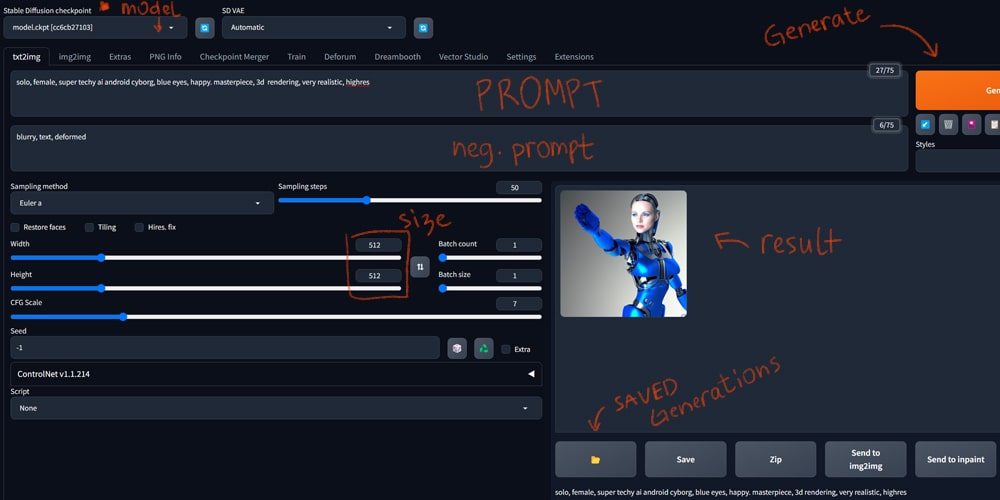
Note: don’t worry if your interface looks slightly different from mine, as I have installed different Automatic1111 extensions over time.
Updating Automatic1111
This software has a lot of passionate people working on it, so new cool features and improvements are constantly coming out. To access them, you will need to update it at some point.
You have two options: manual or automatic updates.
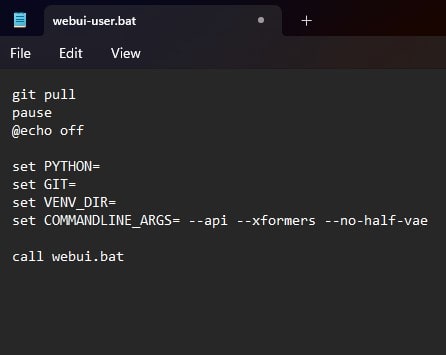
Manual updates will require you to check and install the updates. You can do it by going to the stable-diffusion-webui folder and running the “git pull” command.
This is a safer way since new updates can have bugs and might make you wait for the fix before you can enjoy ai image generation again. One time, I had to wait 2 days, which is not a big deal but worth keeping in mind.
Automatic updates are riskier for the reason mentioned above, but I still prefer them, as 99% of the time it works just fine, and I don’t have to think about it.
To set up automatic updates, find this file:
- Go to your new folder > stable-diffusion-webui
- Find a file named “webui-user.bat” (the one you launch the UI with)
- Right-click it and find the option to “Edit”
- Add “git pull” at the top for automatic updates.
- I also added “pause” to give me the time to read if there are any, but you can skip that part.
- Save and close the file.
And you are done. Never have to think about updates again.
Make Stable Diffusion Generate Faster
My stable diffusion automatic1111 was running somewhat slow before I made the hardware upgrades. I looked for a way to improve the speed and stumbled upon the concept of Xformers.
After I set it up, the speed of generation almost doubled!
To install stable diffusion Xformers:
- Edit your webui.bat file
- add –xformers
- set COMMANDLINE_ARGS= –xformers
Frequently Asked Questions
Can Stable Diffusion run on Mac?
Yes, Stable Diffusion can run on a Mac. You can use it with Automatic1111 or with tools like Draw Things, Diffusers or DiffusionBee. Check out this guide for more information.
Can Stable Diffusion run on AMD GPU?
Yes, you can run Stable Diffusion on an AMD GPU. You should, however, make sure that you have a model above the RX470 and 8GB or above.
Can Stable Diffusion run offline?
Stable Diffusion can run offline when installed locally. With all of the files downloaded and installed on your device, you won’t need the Internet to generate ai images.
Can Stable Diffusion use multiple GPUs?
No, Stable Diffusion can’t run on multiple GPUs at the moment. However, devs are working on it, and this section will be updated when the feature is available.
Can Stable Diffusion damage GPU?
Technically, any use of GPU reduces its lifespan in some manner. Running AI models won’t do considerable harm, just like normal usage or video games.
Can Stable Diffusion run without GPU?
Yes, you can run Stable Diffusion without a GPU by using your CPU instead. However, the generation is incredibly slow with this method. You can learn more about it here.
Where to try Stable diffusion?
To try the Stable Diffusion model before installing it locally, you can visit DreamStudio, the official web app for Stable Diffusion from Stability Ai.