Learn how to install Roop stable diffusion and use it to swap faces of one and multiple people.
With this method, you won’t need to spend hours training a Lora for a simple, realistic, ai-generated photo (unless you want it stylized).
This Roop guide and examples are for educational and entertainment purposes only. (disclaimer)
What is ROOP?
Roop is an AI software that replaces a face from any photo or video with a face of your choice.
Sd-webui-roop is an extension for StableDiffusion’s AUTOMATIC1111 web-ui that allows face-replacement in images. It’s based on Roop but is developed separately.
Today, we are looking at installing and using sd-webui-roop for images.
| ROOP Pros | ROOP Cons |
|---|---|
| Easy to use | Can be tricky to install |
| Fast | Quality can be lacking |
| Doesn’t require much computing power | Only replaces facial features, not the face shape or proportion to the body |
| Doesn’t require much compute power | Might need to run a lot of seeds to get a good result |
Installing ROOP Stable Diffusion
Here is a step-by-step process for installing the ROOP stable diffusion extension for Windows.
You can find some more information on the sd-webui-Roop GitHub page.
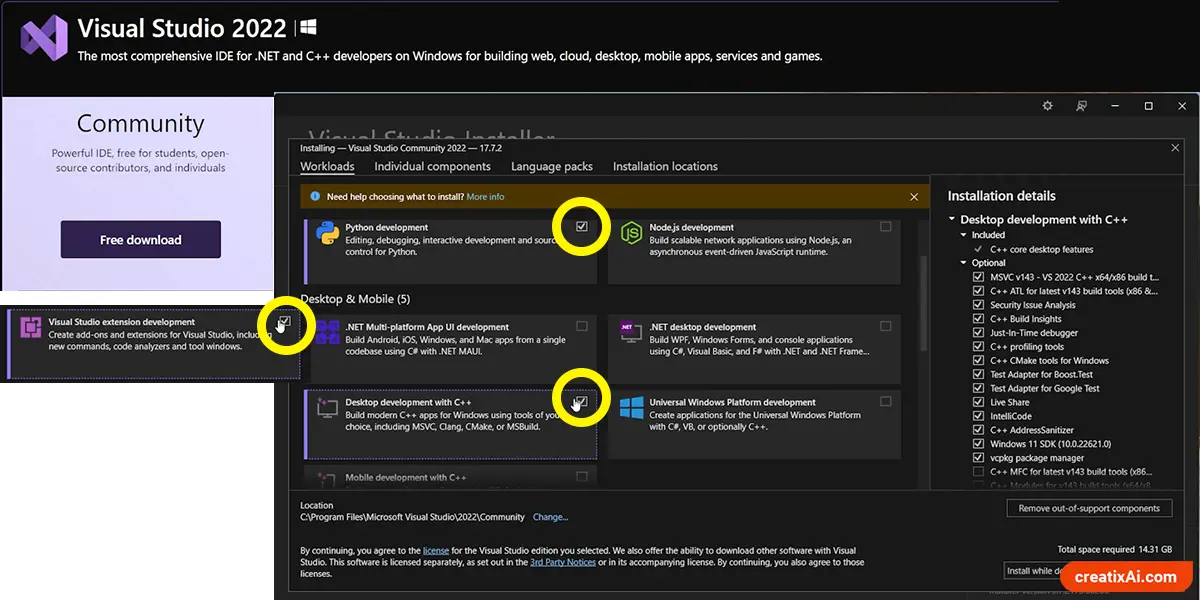
First of all, you will need to install Stable Diffusion with Automatic1111 if you haven’t already.
- Download and install Visual Studio.
- During the installation, checkmark Python and C++ packages (you can remove checkmarks from other things).
- I installed Python development; Desktop development with C++; Visual Studio extension development.
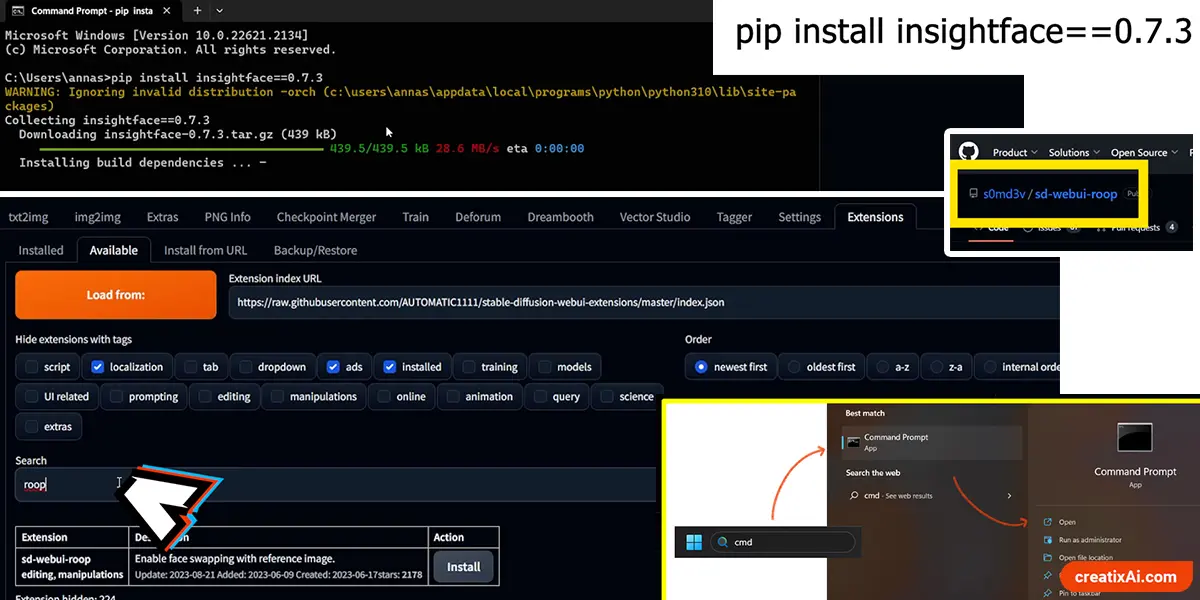
- Open the Command window (cmd) and run this command:
pip install insightface==0.7.3
- In A1111 > Extensions > Install from URL, paste this link:
- https://github.com/s0md3v/sd-webui-roop
- Install, and wait for the confirmation message.
- Close Stable Diffusion and run it again.
ROOP error message
I couldn’t install ROOP for stable diffusion on the first try, so I had to look up how others fixed it on Reddit. I had an error running install.py, among others.
Unfortunately, after 30 minutes of trying different suggestions, it still wasn’t working.
So, I followed my best guess and installed inswapper_128.onnx model, which, for some reason, wasn’t installed together with the ROOP extension.
It wasn’t available from the Roop GitHub page anymore, so I installed it from here instead.
Then, I placed it inside the stable-diffusion-webui\models\roop directory.
So, if you are also getting an error, check if you have the model placed there. If not, follow what I did. But if you do, look up suggestions on Reddit for ways to solve it.
Using ROOP
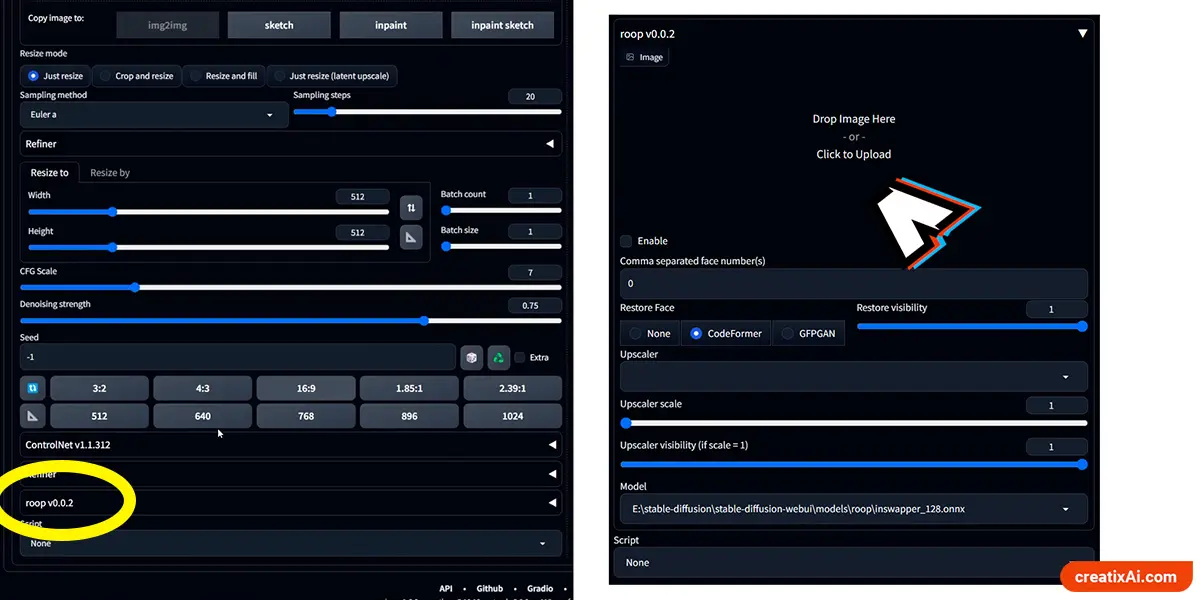
Roop Stable Diffusion can be used in Tex2Img, Img2Img and Inpainting. Scroll down to the “Scripts” section, and you should find an expandable Roop tab just above it.
- Drop an image with the face you want to use.
- Make sure to checkmark “Enable“
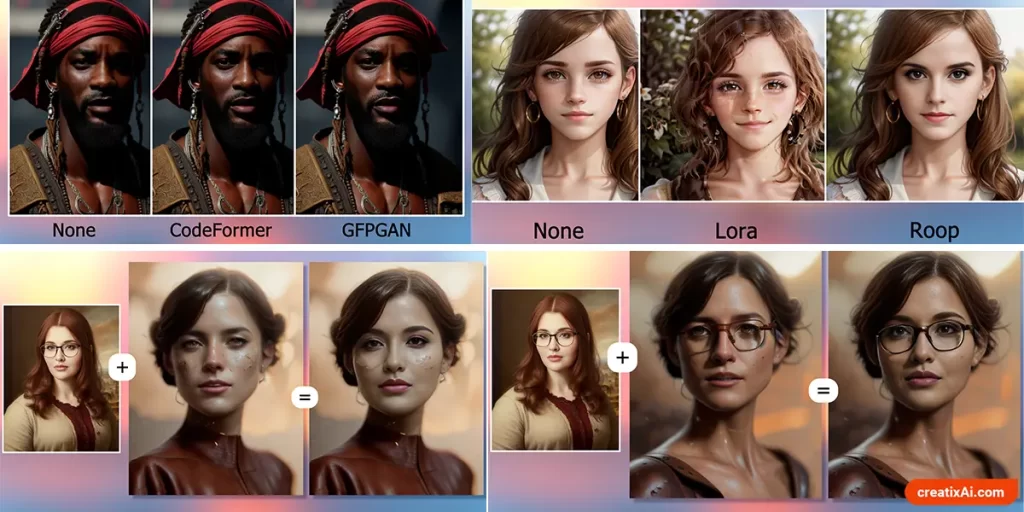
- Restore face – test between CodeFormer and GFPGAN. None produces the worst results.
- Upscaler – I suggest using one and testing which will work best in your case. I often go for 4X-UltraSharp and ESRGAN_4x
- Play with upscaler visibility if there are too many artifacts, or if upscaler is too strong.

It’s worth noting that every image of the person whose face you want to use will have a different result.
Not all faces will be able to be swapped properly onto your ai-generated image. There are a few things to pay attention to:
- Face shape – is very important for optimal likeness!
- Skin tone
- Lighting
- Angle
- Quality
Faces covered with bangs, glasses, hats, etc. will also behave differently.
So, if you can, have a few options at hand and test them all to find the best option.
ROOP Tips and Hacks
From my test, I found that to get the best results with Roop, you should:
- Set batch size higher.
- I set it to 10 with random seed enabled. Most of the results won’t look great. So, by running many, you’ll have a higher chance of finding those that work out perfectly.
- Use a model and prompt for photorealism.
- Roop can’t do stylization, painting, anime, etc. So, for best results, have a model and a prompt for a more realistic image. Photorealism with a bit of digital painting works too.
- Don’t use the Upscaler…yet.
- Enabling Roop upscaler will most probably produce better results.
- But if you are batching 10 images, enabling it right away is a waste of time. Simply re-generate the image with your favourite seed with roop upscaler enabled after you find the perfect one.
- Enable Highresfix.
- I think it’s a setting that should be enabled for all generations, Roop or not.
~ Tip: If you want to swap a person wearing glasses onto an ai-generated image, make sure to have glasses in the prompt as well. Otherwise, they won’t transfer.
By the way, Roop only works well with swapping realistic photographs into other realistic photographs.
And while you can get away with some painterly stuff in the ai-generated image and still swap a face into it with Roop – this won’t work for anime or cartoons.
Swapping faces of multiple people
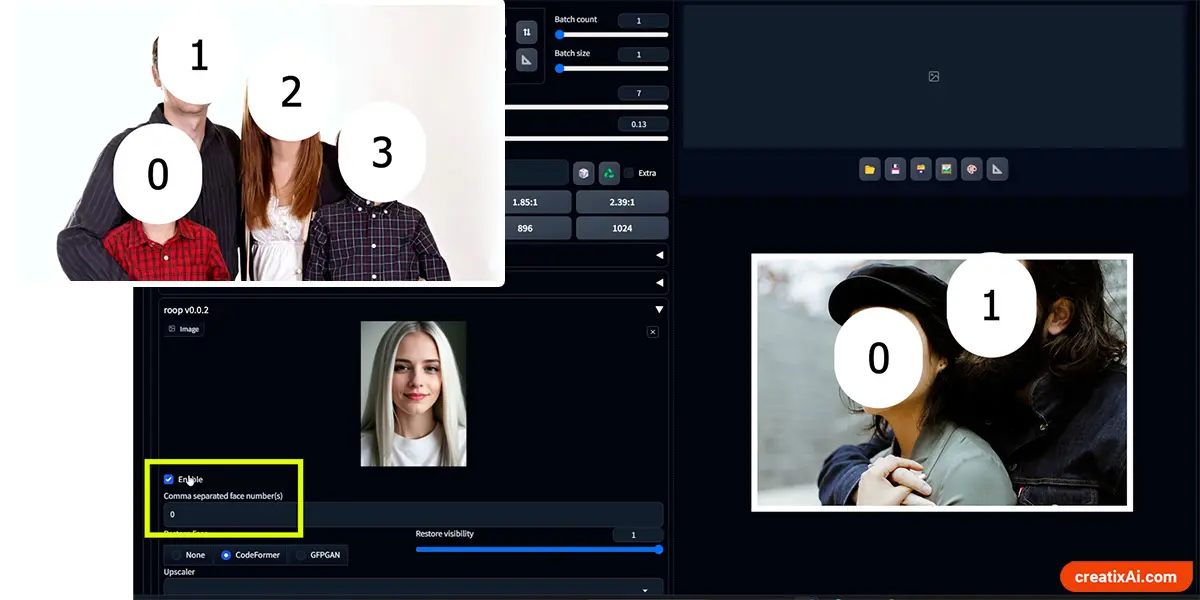
You can swap the faces of multiple people using the Roop extension. The setting responsible for it is called “Comma separated face number(s)“.
For example, let’s say you dropped an image of 4 people into the img2img tab.
The faces will be numbered 0, 1, 2, 3 – from left to right.
- If you want to replace all faces with the same face, type in: 0, 1, 2, 3 in the “Comma separated face number(s)” section.
- If you want to only replace the first person’s face, type in: 0.
- If only the last person: 3. And so on.
You can also replace multiple faces with multiple different faces:
- replace the first person’s face using “0”,
- Send the newly generated image with the replaced face to img2img.
- Drop a new reference face inside roop, and type in “1”.
- This way, you replace the faces in the original image with 2 different new faces.
Make sure your denoising strength is close to 0, so the image doesn’t change too much from one generation to the other.
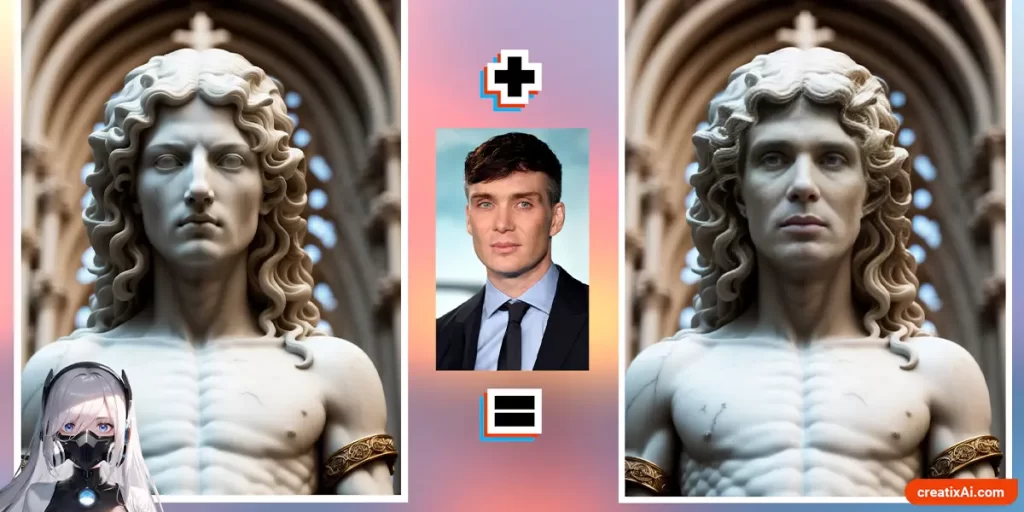
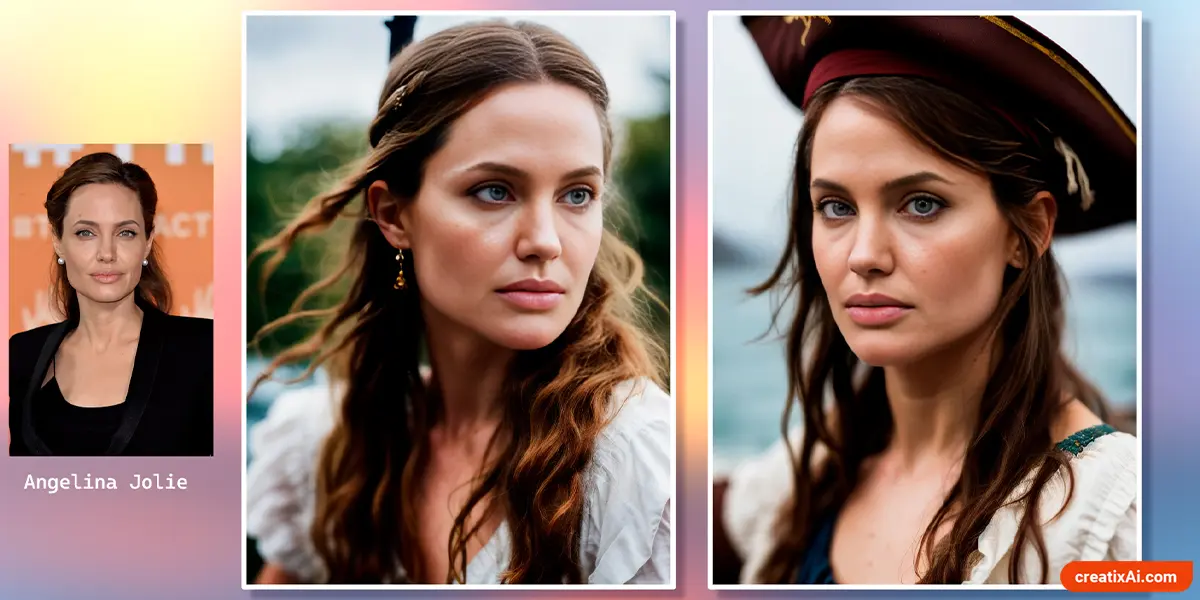
Examples of ROOP in action
Below, you’ll find examples of what Roop is capable of when it comes to deep-faking images. These generations are for entertainment purposes only. Please use Roop with respect for others ^^


Hope you enjoyed this Roop Stable Diffusion installation guide and tutorial. Let me know in the comments what you’d like me to cover next. Cheers!
Disclaimer
Note: the disclaimer below is copied from sd-webui-roop GitHub page.
This software is meant to be a productive contribution to the rapidly growing AI-generated media industry. It will help artists with tasks such as animating a custom character or using the character as a model for clothing etc.
The developers of this software are aware of its possible unethical applicaitons and are committed to take preventative measures against them. It has a built-in check which prevents the program from working on inappropriate media. We will continue to develop this project in the positive direction while adhering to law and ethics. This project may be shut down or include watermarks on the output if requested by law.
Users of this software are expected to use this software responsibly while abiding the local law. If face of a real person is being used, users are suggested to get consent from the concerned person and clearly mention that it is a deepfake when posting content online. Developers of this software will not be responsible for actions of end-users.