Let’s look at the ControlNet Canny preprocessor + model and test it to its limit. This is a ControlNet Canny tutorial and guide based on my tests and workflows.
In this article, I’ll show you how to use it and give examples of what to use ControlNet Canny for.
To follow along, you will need to have the following:
- Stable Diffusion Automatic 1111 installed.
- ControlNet extension installed. (check out ControlNet installation and guide to all settings.)
I’ve written tutorials for both, so follow along in the linked articles above if you don’t have them installed already.
I’ve also made a video version of this ControlNet Canny tutorial for my YouTube channel. Check it out below:
What is ControlNet Canny?
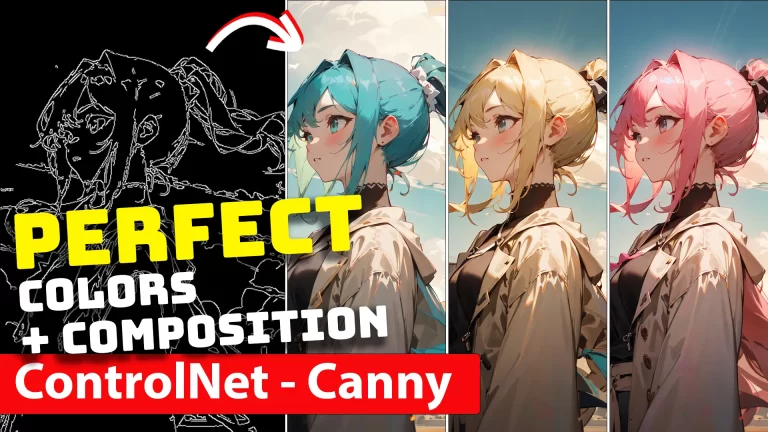
ControlNet Canny is a preprocessor and model for ControlNet – a neural network framework designed to guide the behaviour of pre-trained image diffusion models. Canny detects edges and extracts outlines from your reference image.
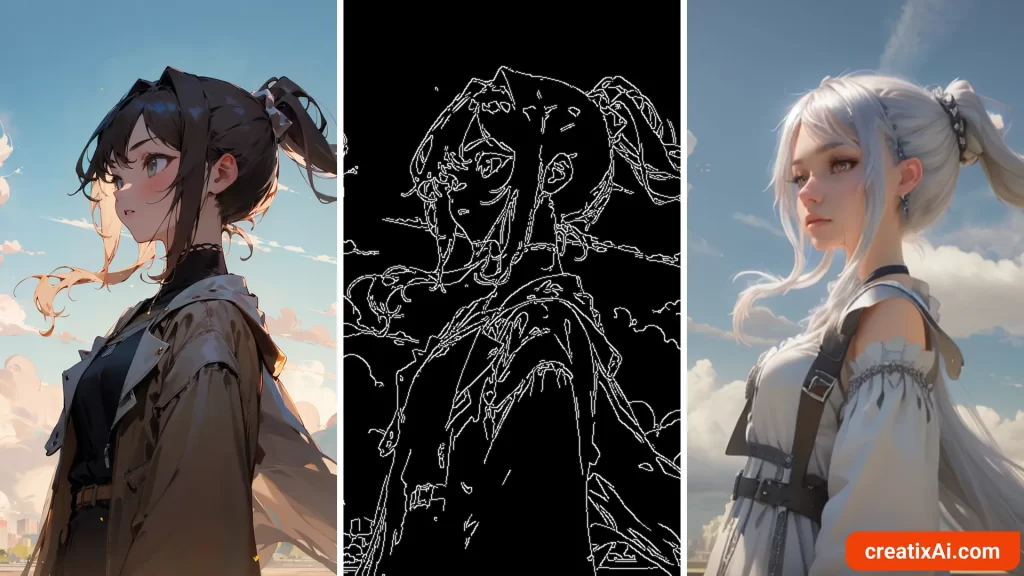
Canny preprocessor analyses the entire reference image and extracts its main outlines, which are often the result of sharp edges and changes in dark and light tones.
While some preprocessors only pay attention to the main character, like OpenPose, Canny will create outlines for the characters, background and foreground.
Simple ControlNet Canny Workflow
If you are wondering how to use ControlNet Canny, let me show you a very simple workflow.
This is just the basics, and more interesting uses are coming up later in the article.
- Pick your model – I used RevAnimated.
- Write a prompt – here’s mine:
- english lady, blonde hair, jewelry, period pieces, 1600s, painterly brushstrokes background, painting, illustration, masterpiece, highres
- negative: deformed, lowres, blurry
- Chose your settings
- Euler a – 25 steps – 640×832 – CFG 7 – Seed: random
Now, open up the ControlNet tab.
- Drop your reference image.
- Select “Enable” and choose “Canny”.
- If you want to see Canny in action, checkmark “Allow Preview” and Run Preprocessor (exploding icon).
- Leave the other settings as they are for now.
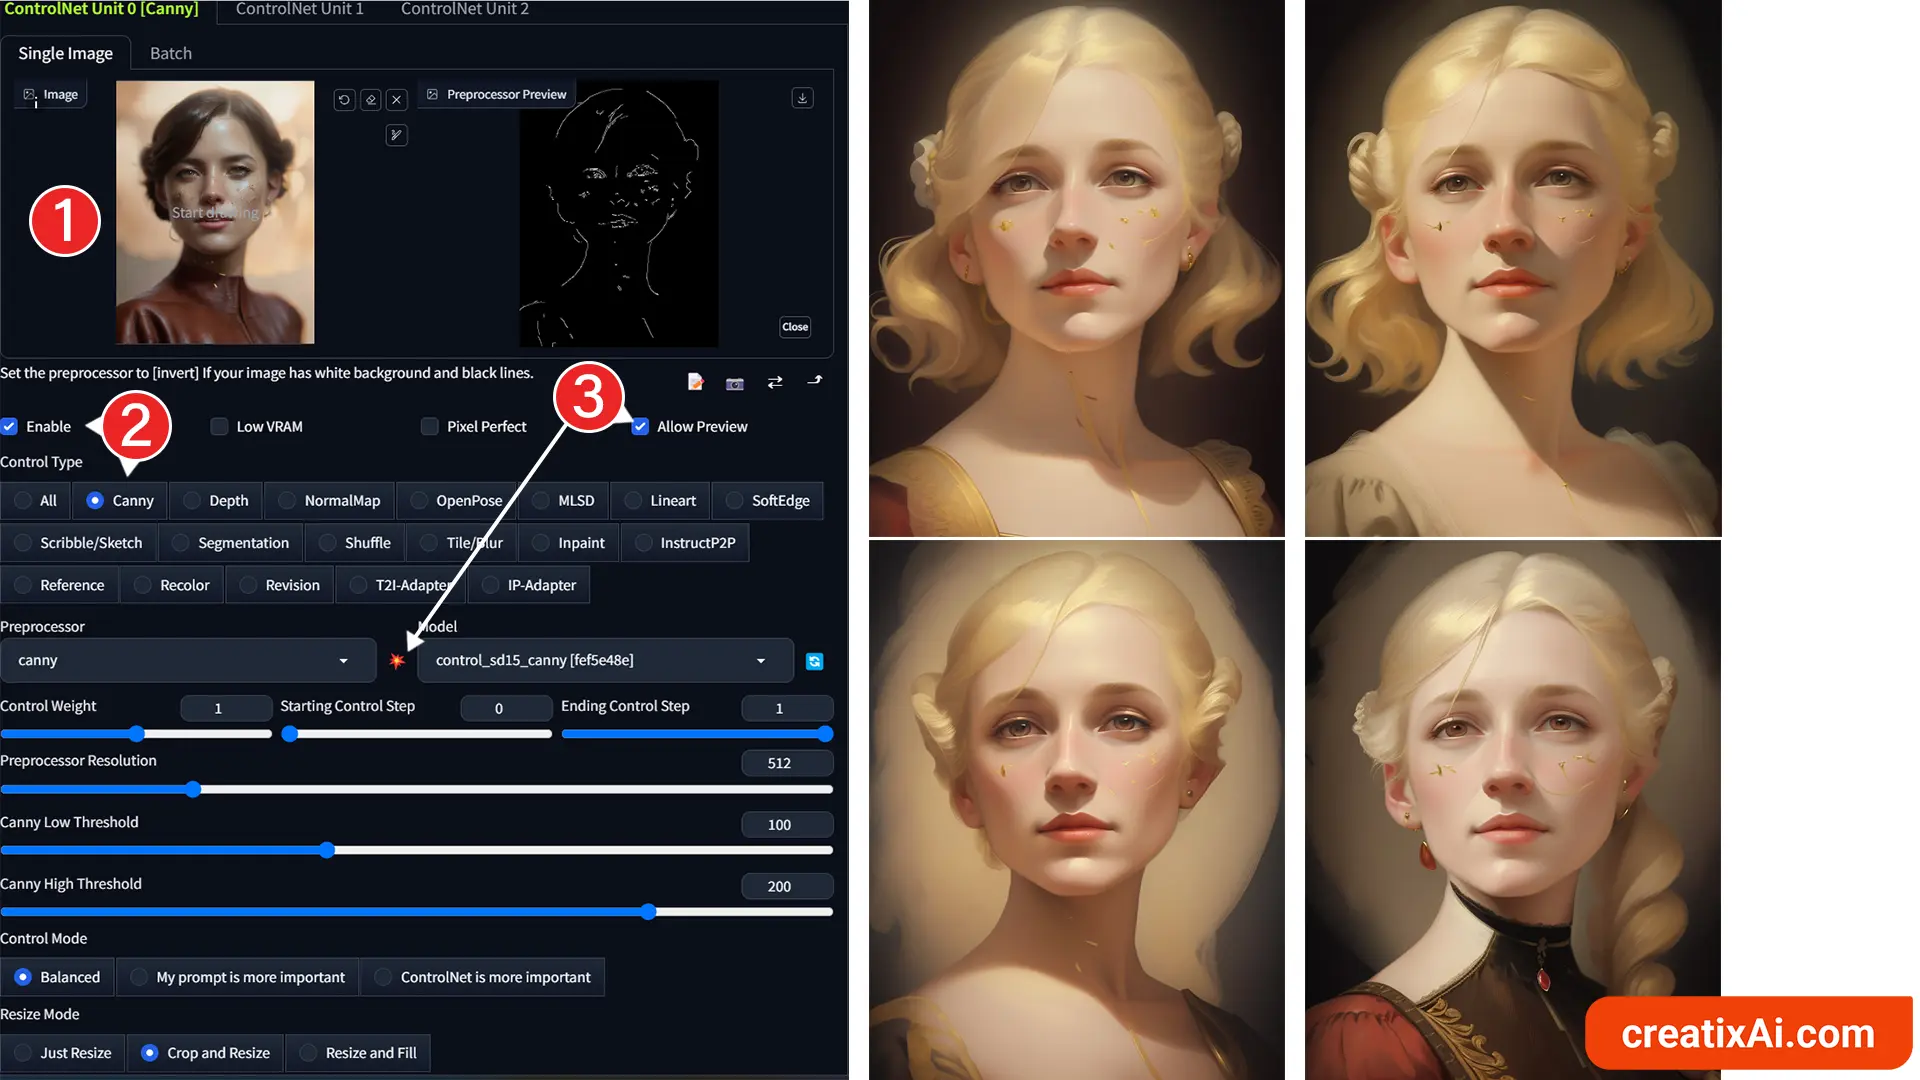
Notice how the overall composition and facial features remain in the final generation while being changed based on our prompt.
ControlNet Canny – SDXL
The current common models for ControlNet are for Stable Diffusion 1.5, but you can download extra models to be able to use ControlNet with Stable Diffusion XL (SDXL).
- Download any Canny XL model from Hugging Face.
- Make sure to select the XL model in the dropdown.
For my SDXL checkpoints, I currently use the diffusers_xl_canny_mid. But any from the above link should do.
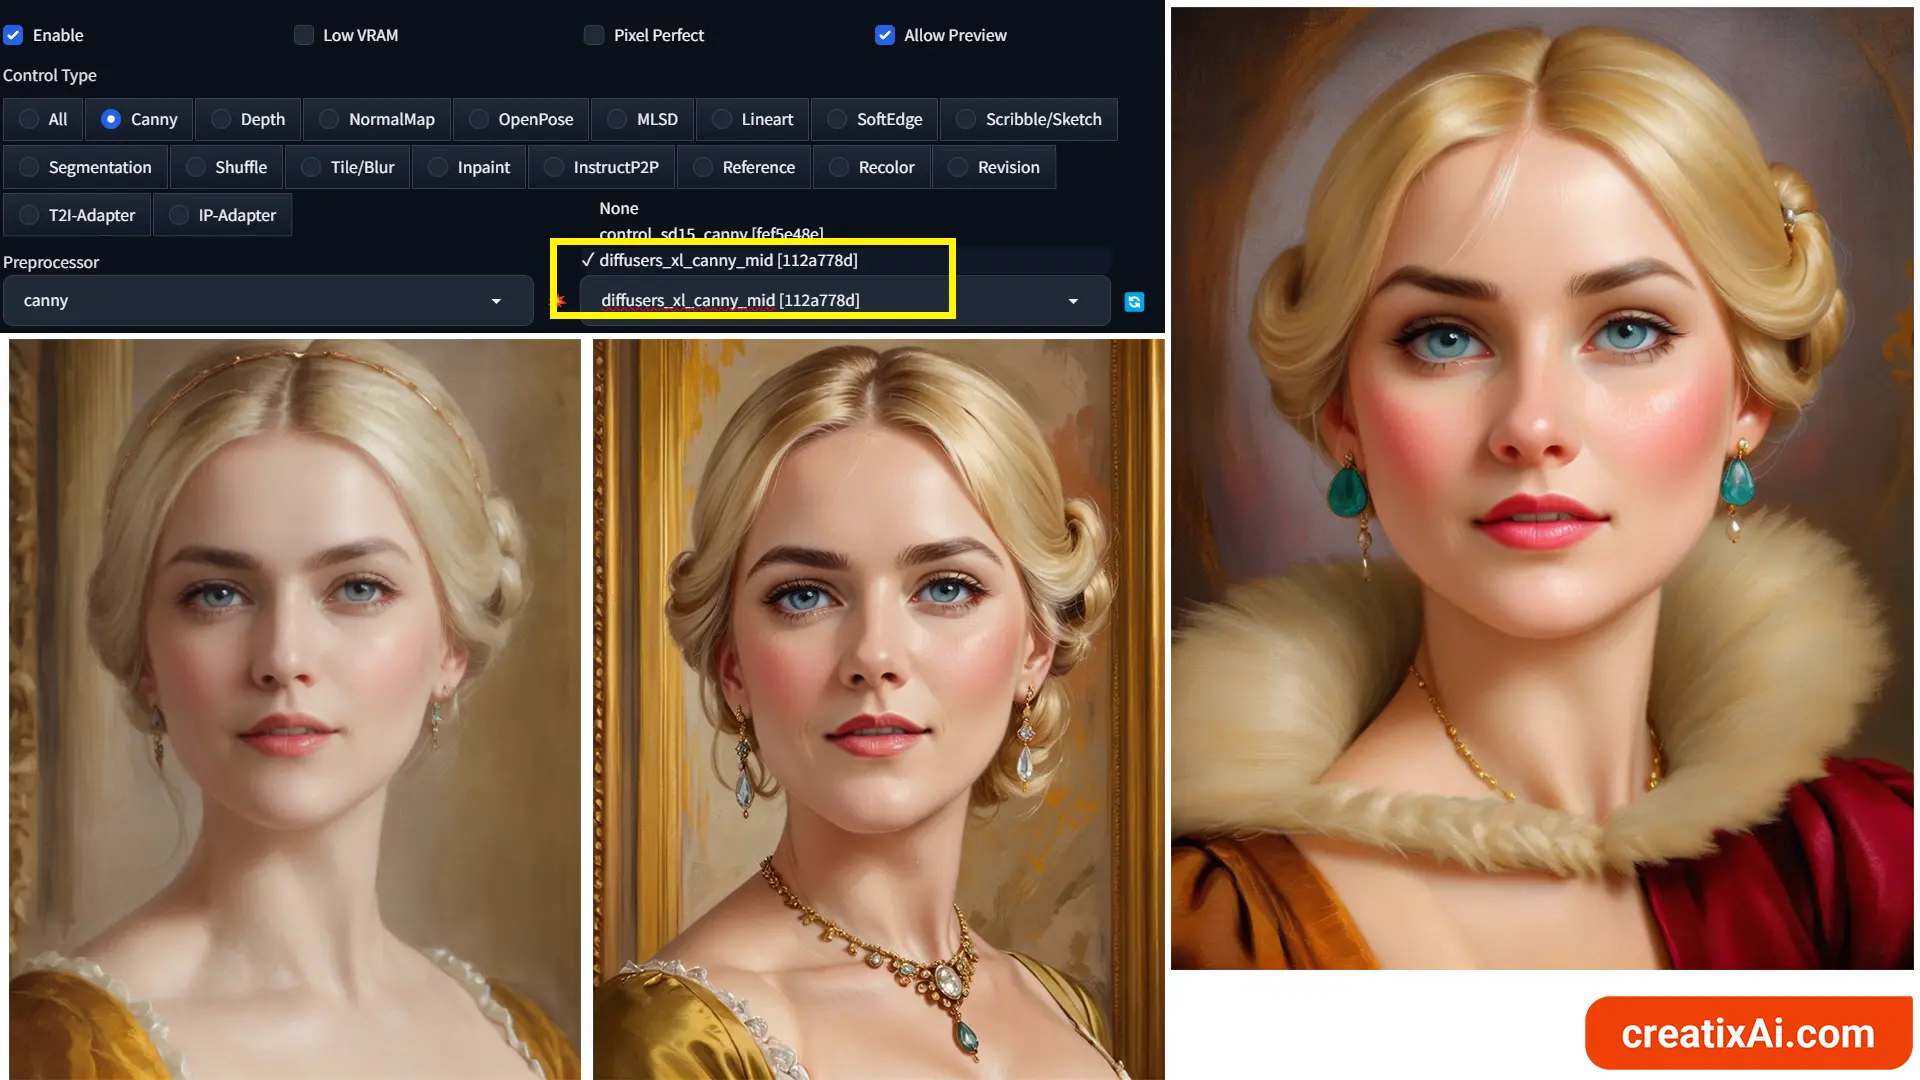
As you can see in the examples above, I used three different SDXL checkpoints with ControlNet Canny for some lovely results.
ControlNet Canny Threshold
When selecting the Canny preprocessor, you might have noticed two additional settings that aren’t available for other ControlNet preprocessors – Canny Threshold.
- Canny Low Threshold – anything below the number gets discarded.
- Canny High Threshold – anything above the number is always kept.
Values between Low and High are either kept or discarded depending on other mathematical factors.
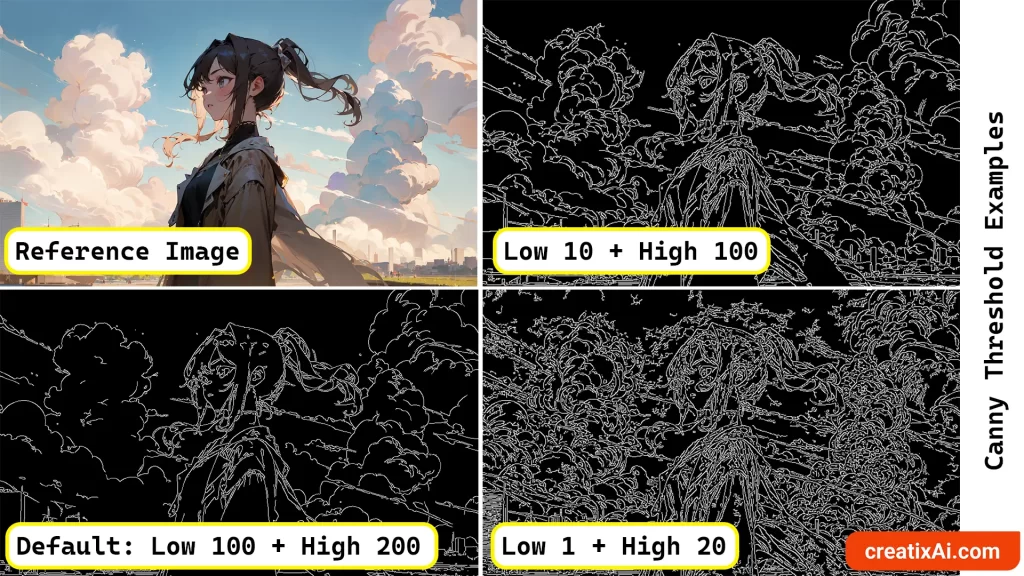
Notice how different the Canny edge outputs are and how much information is retained in each.
But is it always necessarily better to have a higher amount of edges detected?
I think it depends.
If you are using Canny to retain a specific composition, silhouette or body pose, but want to create a unique image – then I’d go with the default or Pixel Perfect setting enabled.
But, if you are looking to retain a specific structure, for example, facial likeness, then a higher amount of details in the preprocessor will produce better results.
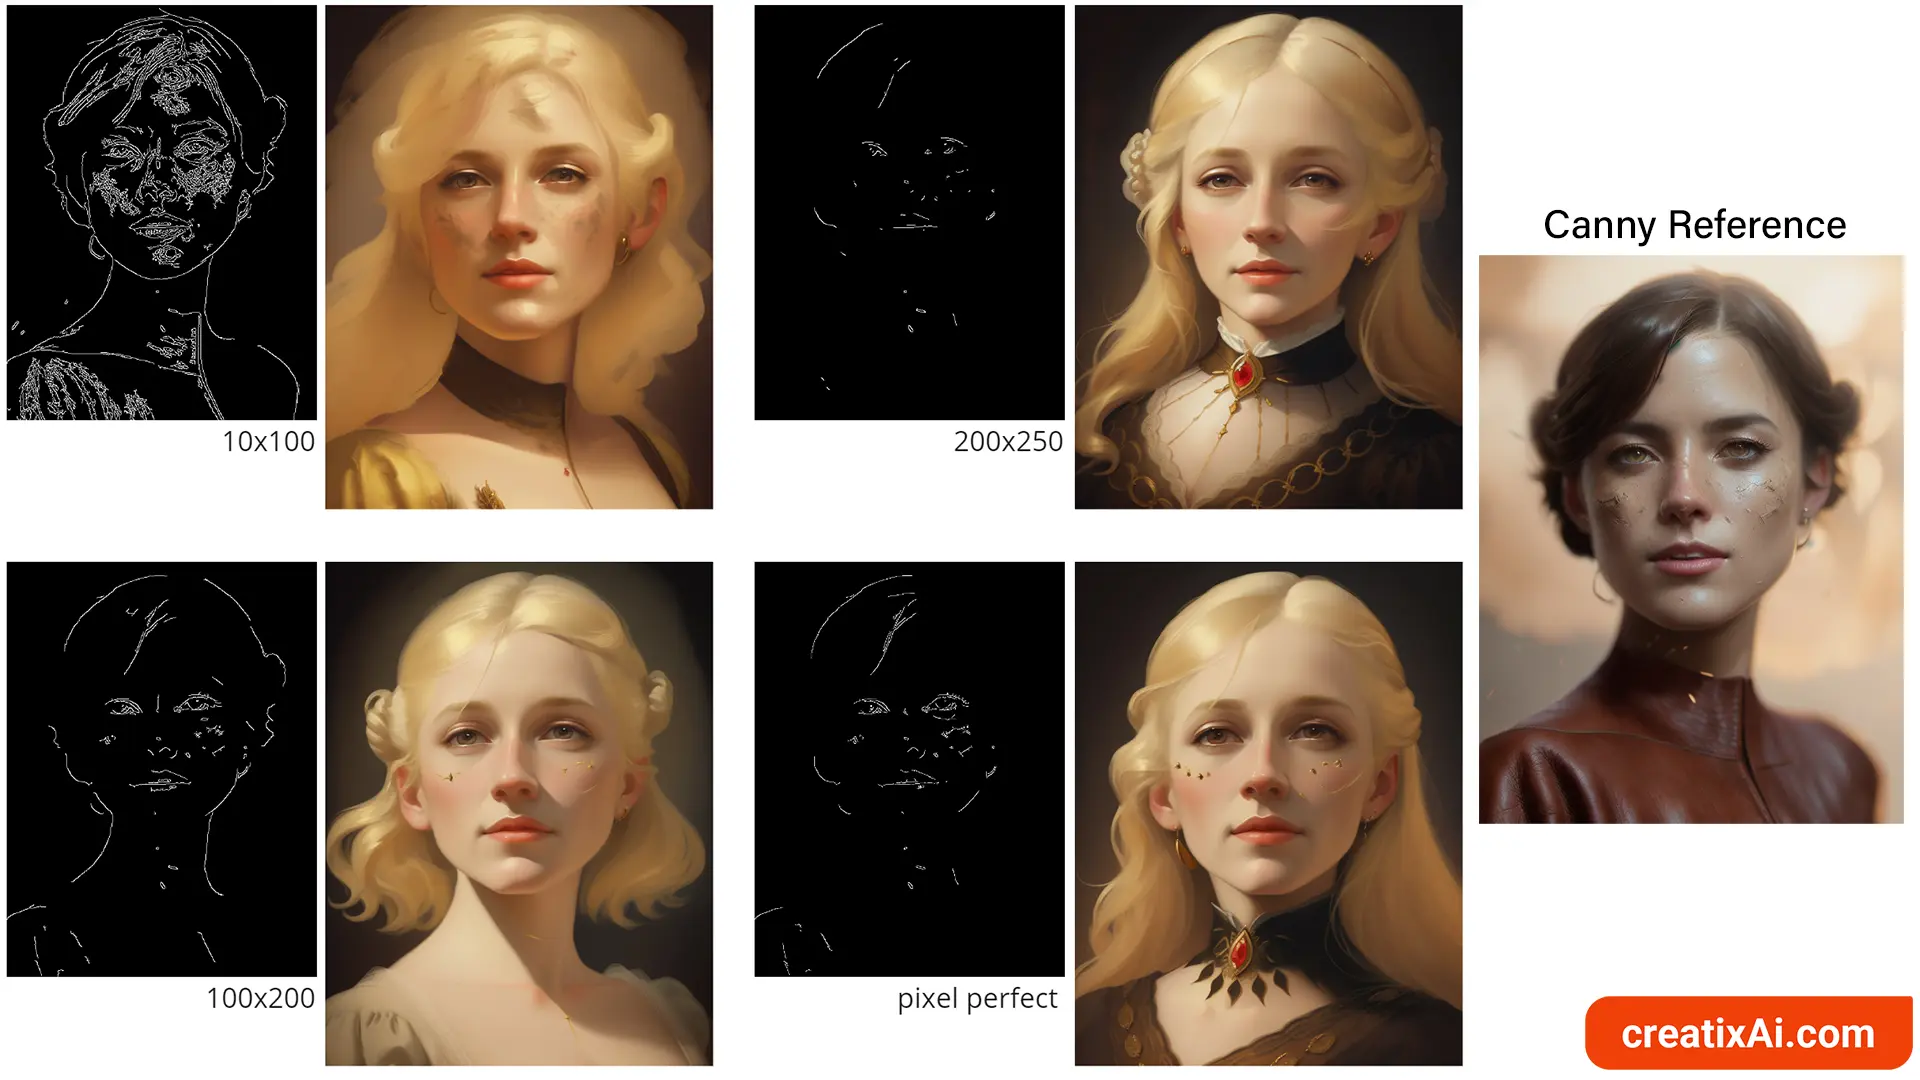
From the example above, notice how little resemblance to the original image is recreated with the threshold set to Low 200 and High 250.
In comparison, the Canny Threshold Low 10 and High 100 created the most detailed output, retaining the most likeness of the facial features.
ControlNet Canny img2img
Using the Img2img tab you can also use the ControlNet Canny feature.
One way to do so would be by dropping an image you want to start with and then enabling ControlNet Canny in the tab below (the same way as with txt2img).
If you want to use the same reference image in img2img and ControlNet – you simply enable it; there’s no need to upload it again.
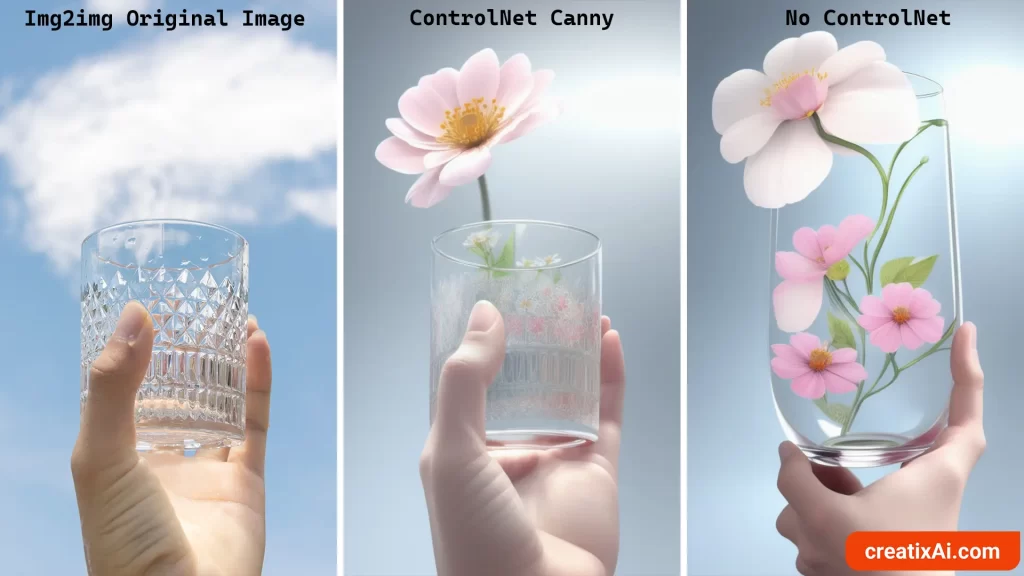
In this case, I used a photo of a person holding a glass and changed the prompt to:
a hand holding a glass, flower growing inside a glass, blooming, photorealistic, digital painting, masterpiece, highres.
With Canny Control weight at 0.5, and img2img denoising strength at 0.75 I was able to get an interesting result.
The composition is still there; the hand and the glass look good, but we also have the flowers inside as well.
With all other settings the same, but without enabling ControlNet the image doesn’t look so good at all.
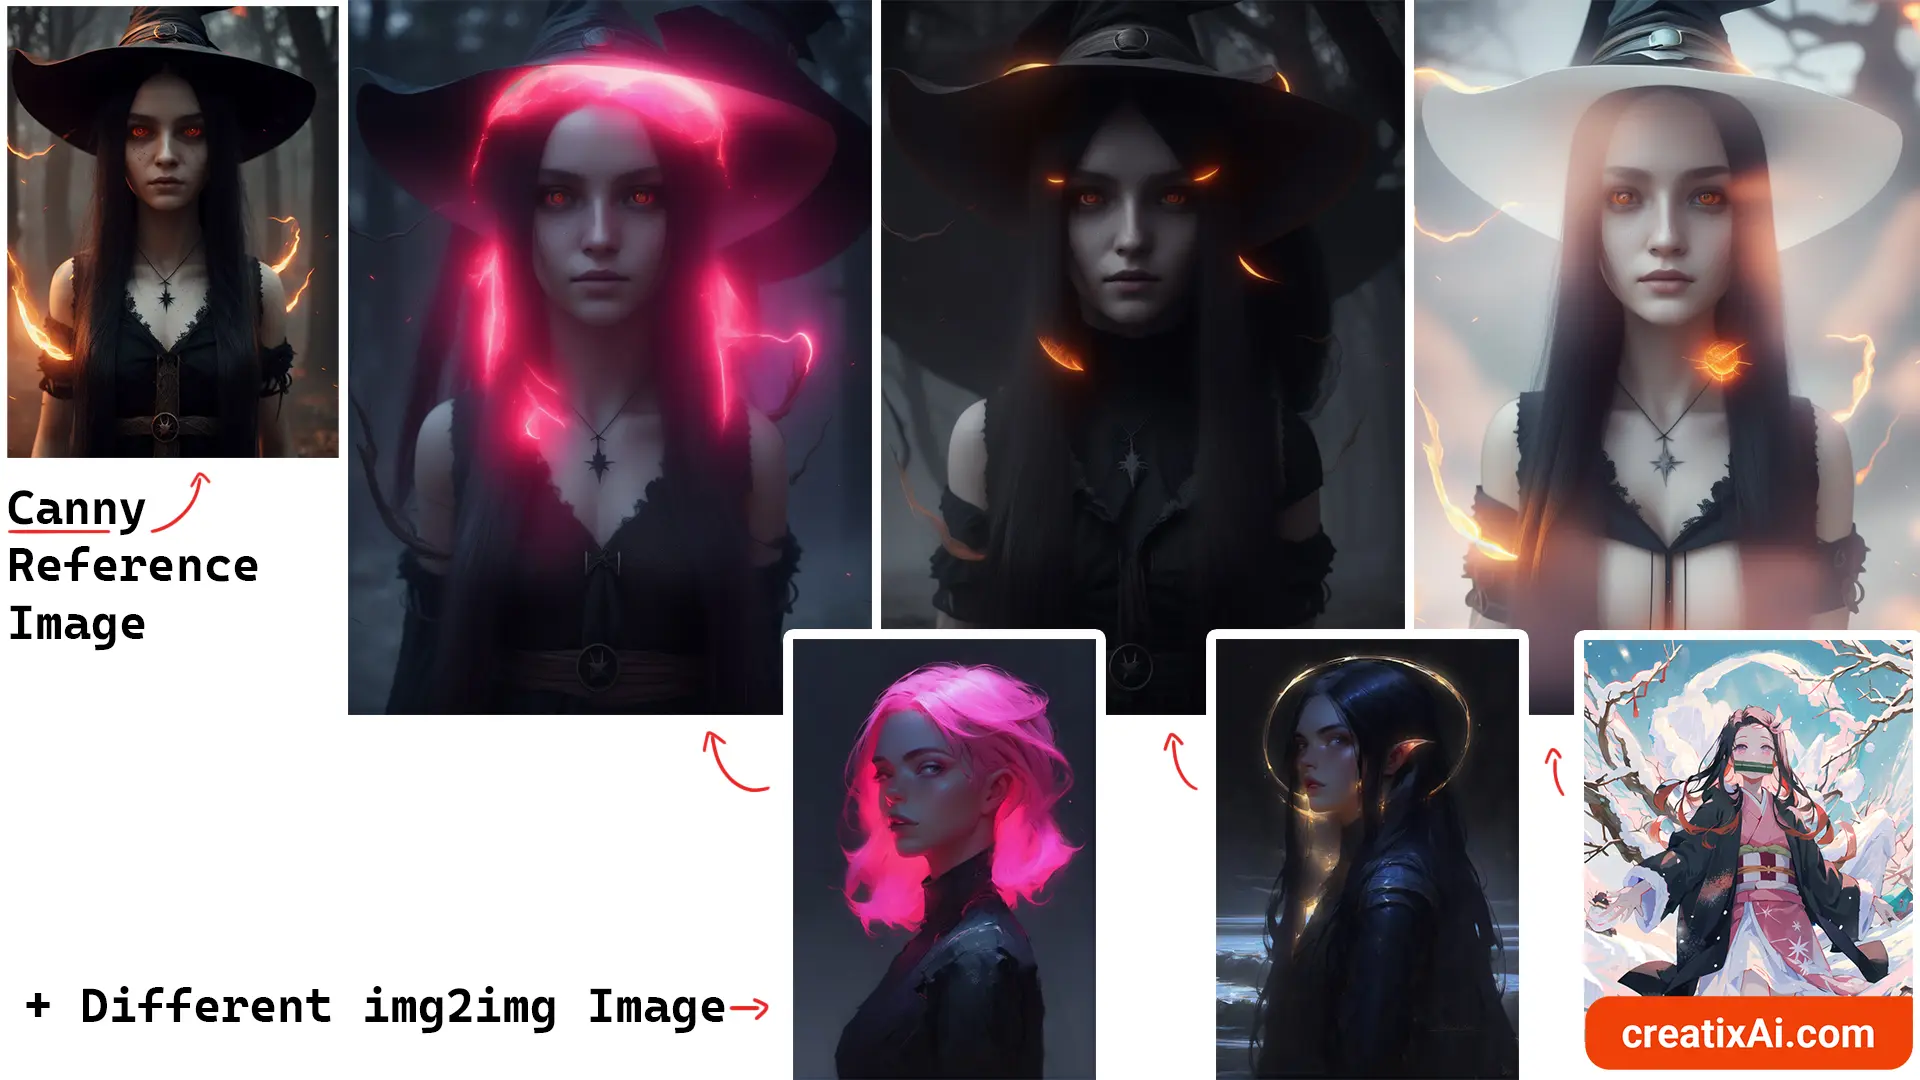
Another way, and probably a more fun way of using it is by having two different images to work with.
- First, generate an ai-image with Stable Diffusion (preferably without highres. fix).
- Then, send that image with all its parameters to the img2img tab.
- Enable ControlNet – Canny, but select the “Upload independent control image” checkbox.
- Drop your ai-generated image here as a reference.
- Scroll back up and change the img2img image to anything else that you want!
For the example images below, I mostly used a denoising strength of 0.65 and a ControlNet Canny weight of 1. Just look how cool these turned out!
We can see the same character and composition everywhere but with completely unique colour combinations.
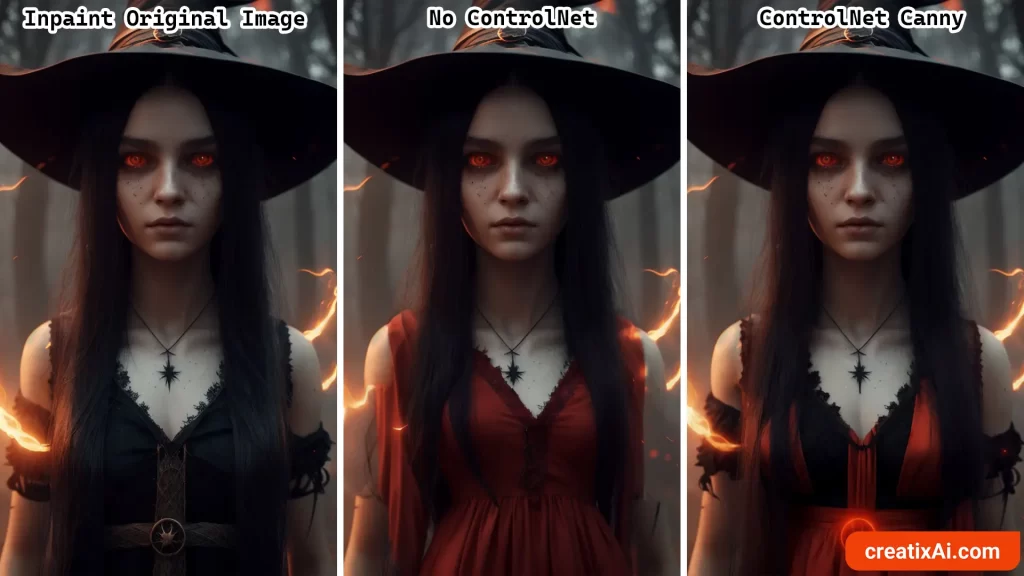
ControlNet Canny Inpaint
ControlNet is available with the Inpaint option also, so let’s see one example where it could come in handy.
Now, let’s say we wanted to change the colour of the dress to red while retaining the design of the dress.
To make such a big colour change, we will probably need to use a high denoising strength, I used 0.9.
When I run this generation with “Masked Only” enabled, the color of the dress changes, but it no longer matches the rest of the body, and it’s a new dress entirely.
So, instead, I enabled ControlNet Canny and got the dress to be more red, but with the same design.
ControlNet Canny Examples
Below, you’ll find a few more ControlNet Canny examples.
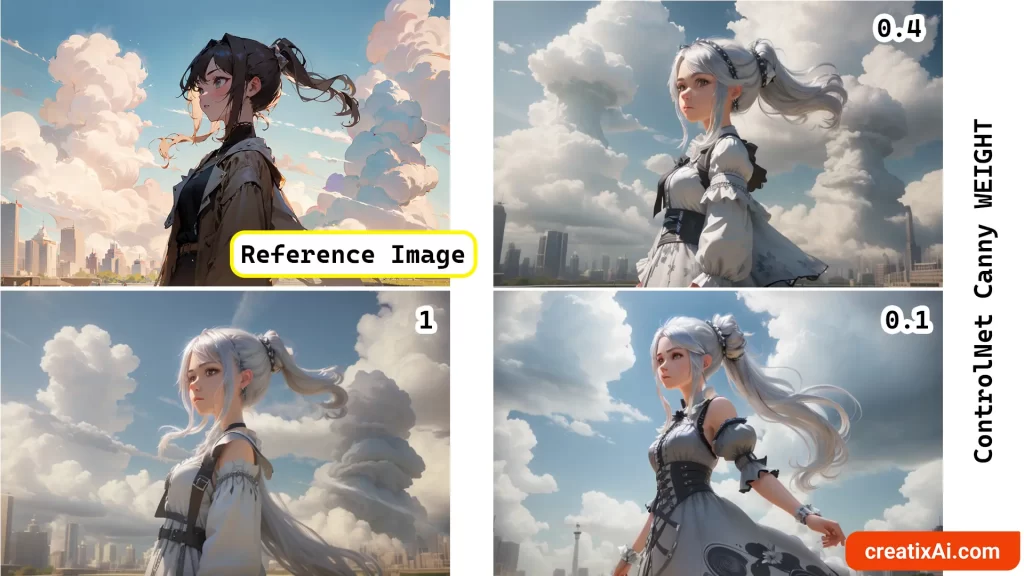
In the first example, I played with the Control Weight to adjust how much ControlNet influences the final output. In this case, I changed the prompt so that the girl has silver hair and is wearing a dress.
We can see how the image changes depending on the weight you choose, with 1 being the strongest influence and 0.1 being almost non-existent.
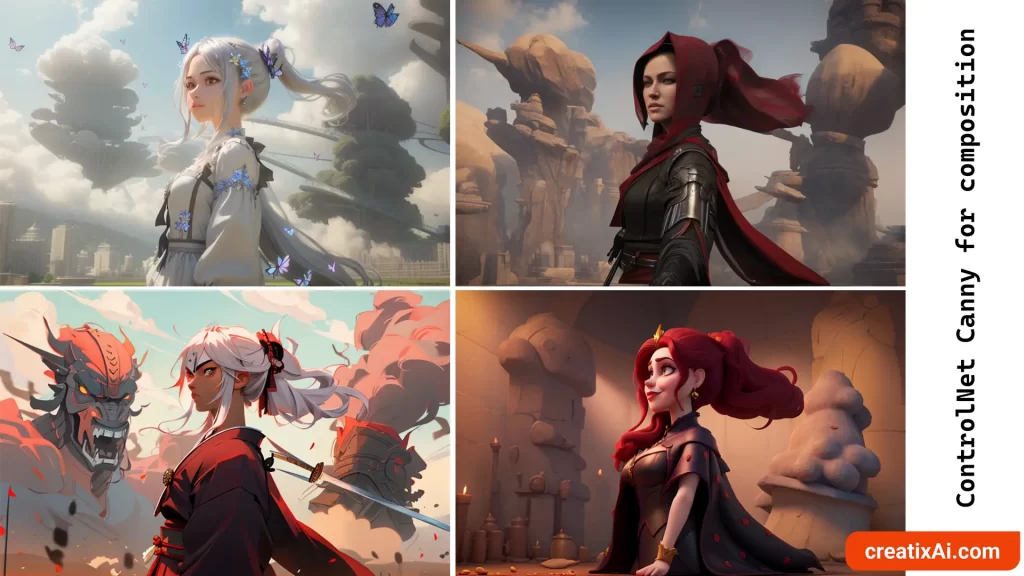
Canny is great for many creative uses, including composition.
Check out how different prompts and checkpoints create a totally unique ai-generated image while retaining the overall composition.
Even if the clouds become something else, the shape of something there remains.
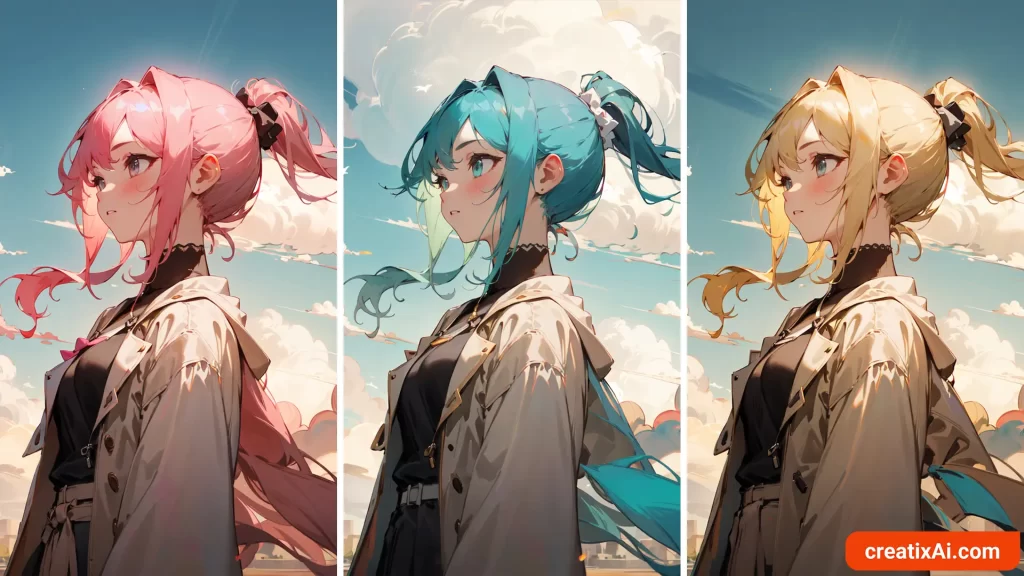
It’s also wonderful for changing certain parts of the image while leaving most other details in place.
In the example below, I used all of the same settings and the same checkpoint but added “pink hair,” “turquoise hair,” and “blonde hair.” I love this amount of control.
I hope you enjoyed this quick and easy guide to the ControlNet Canny model!
More is coming.