ControlNet is one of the most powerful tools available for Stable Diffusion users. This article aims to serve as a definitive guide to ControlNet, including definition, use cases, models and more.
Check out the full table of contents in the sidebar on the right to skip around the article to the parts you find the most interesting.
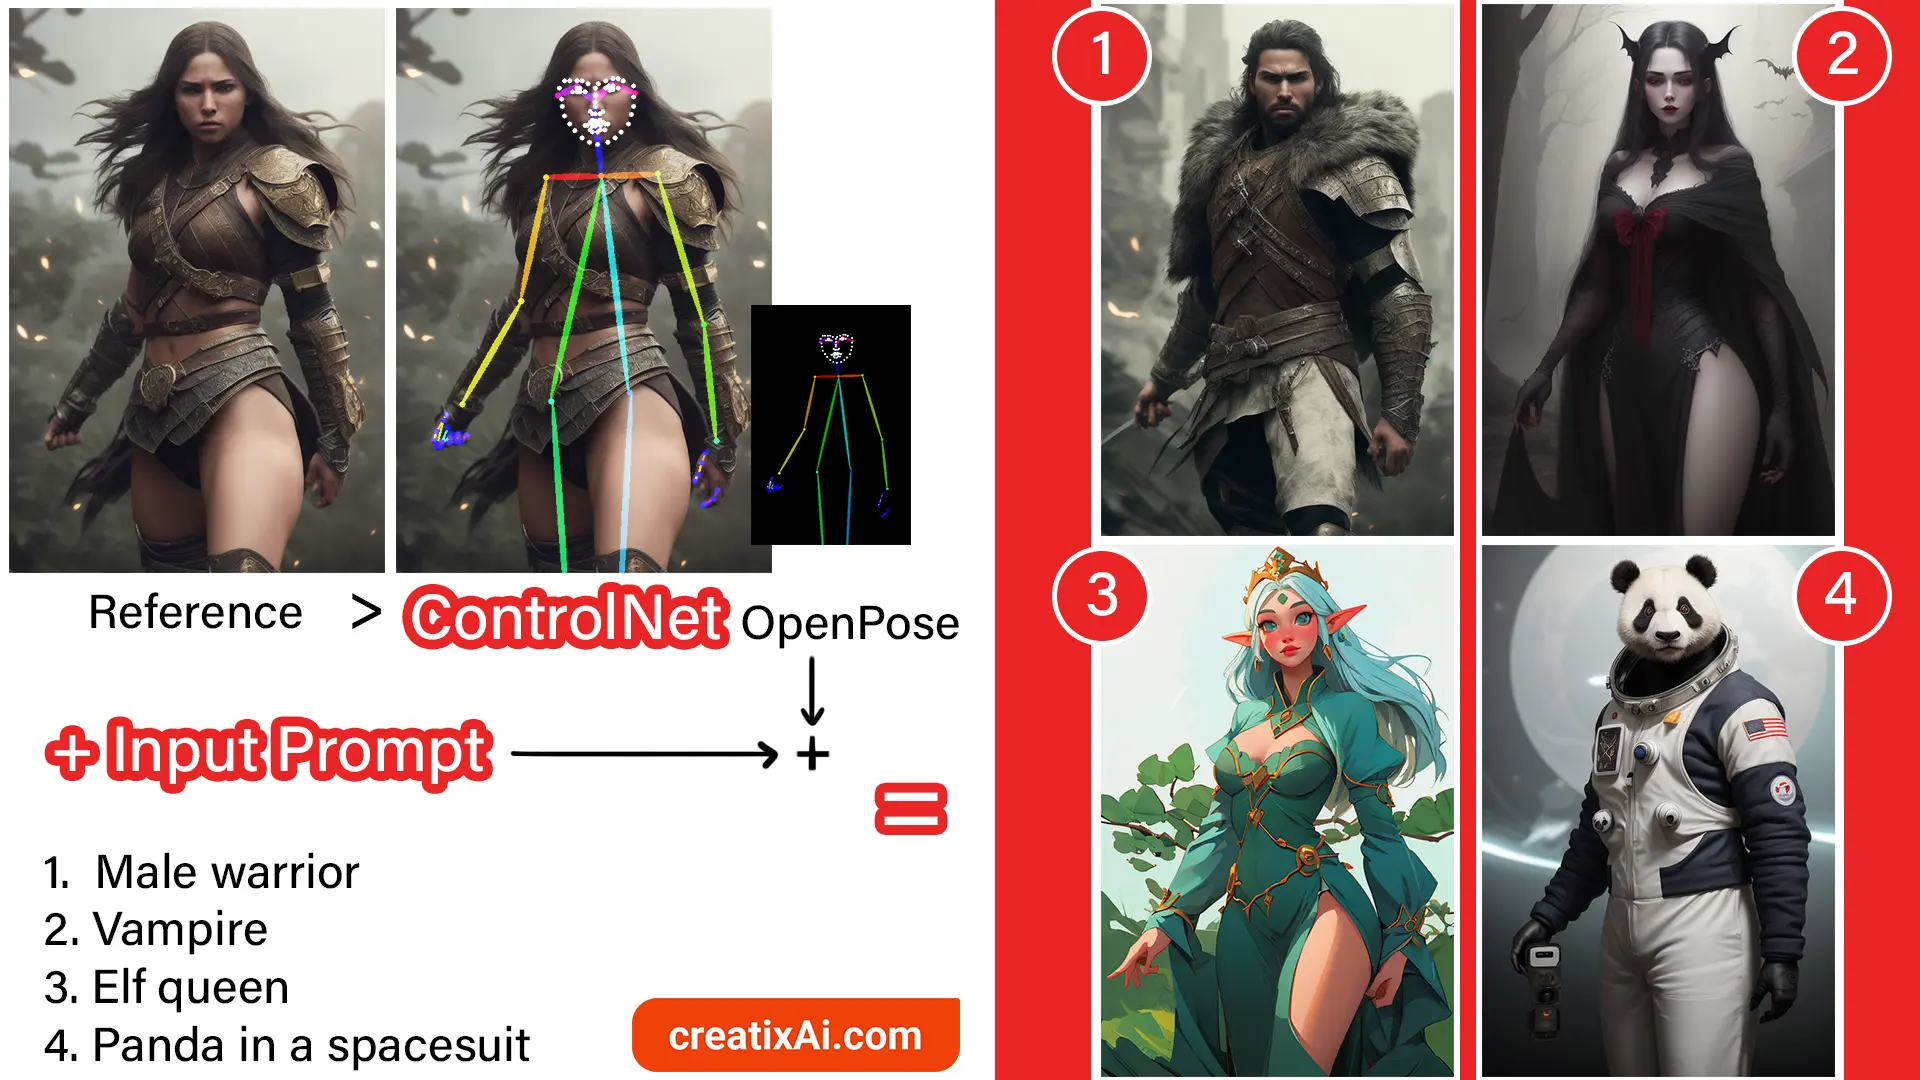
What is ControlNet?
ControlNet is a neural network framework specifically designed to modulate and guide the behaviour of pre-trained image diffusion models, such as Stable Diffusion.
By integrating additional conditions like pose, depth maps, or edge detection, ControlNet enables users to have more precise influence over the generated images, expanding the capabilities of traditional text-to-image generation.
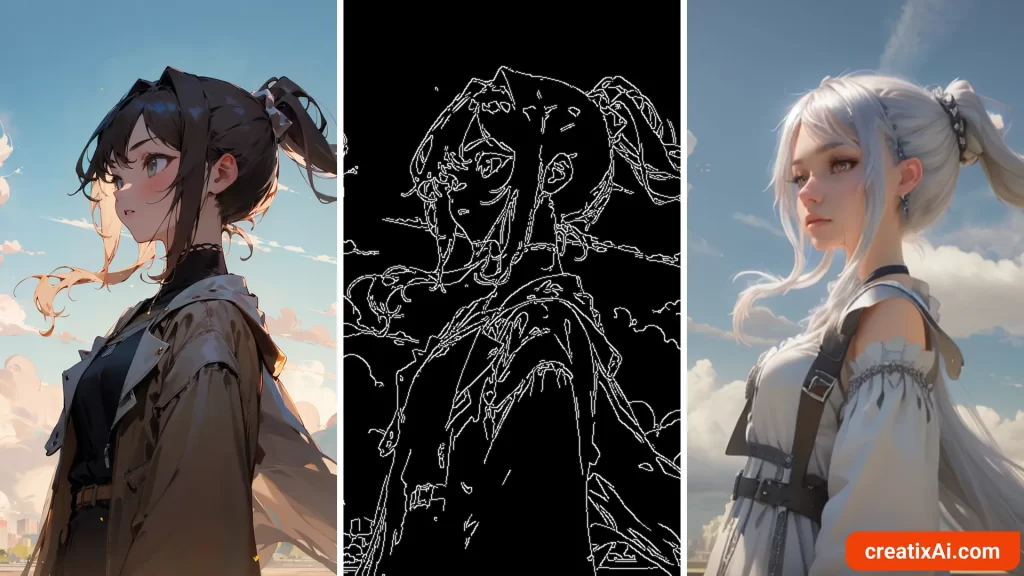
For example, in the diagram below, you will see how ControlNet creates an OpenPose based on our reference image.
Using this pose, in addition to different individual prompts, gives us new, unique images that are based on both the ControlNet and the Stable Diffusion prompt we used as input.
Installing ControlNet
Below is a step-by-step guide on how to install ControlNet for Stable Diffusion.
To make it work, we will be installing this extension to your Automatic1111 Webui (popular and free GUI; click for install guide).
If you already have it installed, keep scrolling for a guide on how to use it.
- Go to the Extensions tab.
- Select the Install from URL tab.
- Paste the link below into the URL for extension’s git repository field:
https://github.com/Mikubill/sd-webui-controlnet
- Click the Install button.
- Wait for the message saying the extension is installed.
- Restart AUTOMATIC1111 webui.
After installing ControlNet, you’ll see a new collapsible section called ControlNet. Find it in the text2img and img2img tabs right above the Scripts tab.
- Go to ControlNet-v1-1 models page to download .pth files of the models you want.
- NOTE: make sure the model version matches the ControlNet version, or ControlNet might not be working properly! So check this place sometimes for updates.
- Visit the ControlNet models page to download extra models for SDXL if you want.
- You can also download extra T2I models for color, style and others from here.
- Put the model file(s) in the ControlNet extension’s models directory.
stable-diffusion-webui\extensions\sd-webui-controlnet\models
- Restart AUTOMATIC1111 webui.
Updating ControlNet extension
ControlNet has frequent important updates and developments. To get the best tools right away, you will need to update the extension manually.
- Go to the Extensions tab in Automatic1111.
- Click on the “Check for Updates” button.
- Find Controlnet on the list and see if there are any new commits.
- Click on the “Apply and restart UI” button.
Give it a moment to update, and you are all done!
Adding more ControlNet Models
You might want to adjust how many ControlNet models you can use at a time. I recommend setting it to 2-3. To change the max models amount:
- Go to the Settings tab.
- Find and click ControlNet on the left sidebar.
- Find the slider called Multi ControlNet: Max models amount (requires restart).
- Move the slider to 2 or 3.
- Scroll back up and click Apply Settings.
- Finally, click Reload UI.
Now, you should be able to see ControlNet Unit 0, ControlNet Unit 1, and maybe ControlNet Unit 2 in the ControlNet section.
ControlNet Interface Settings
Below, you will find an explanation for each setting in the ContolNet tab.
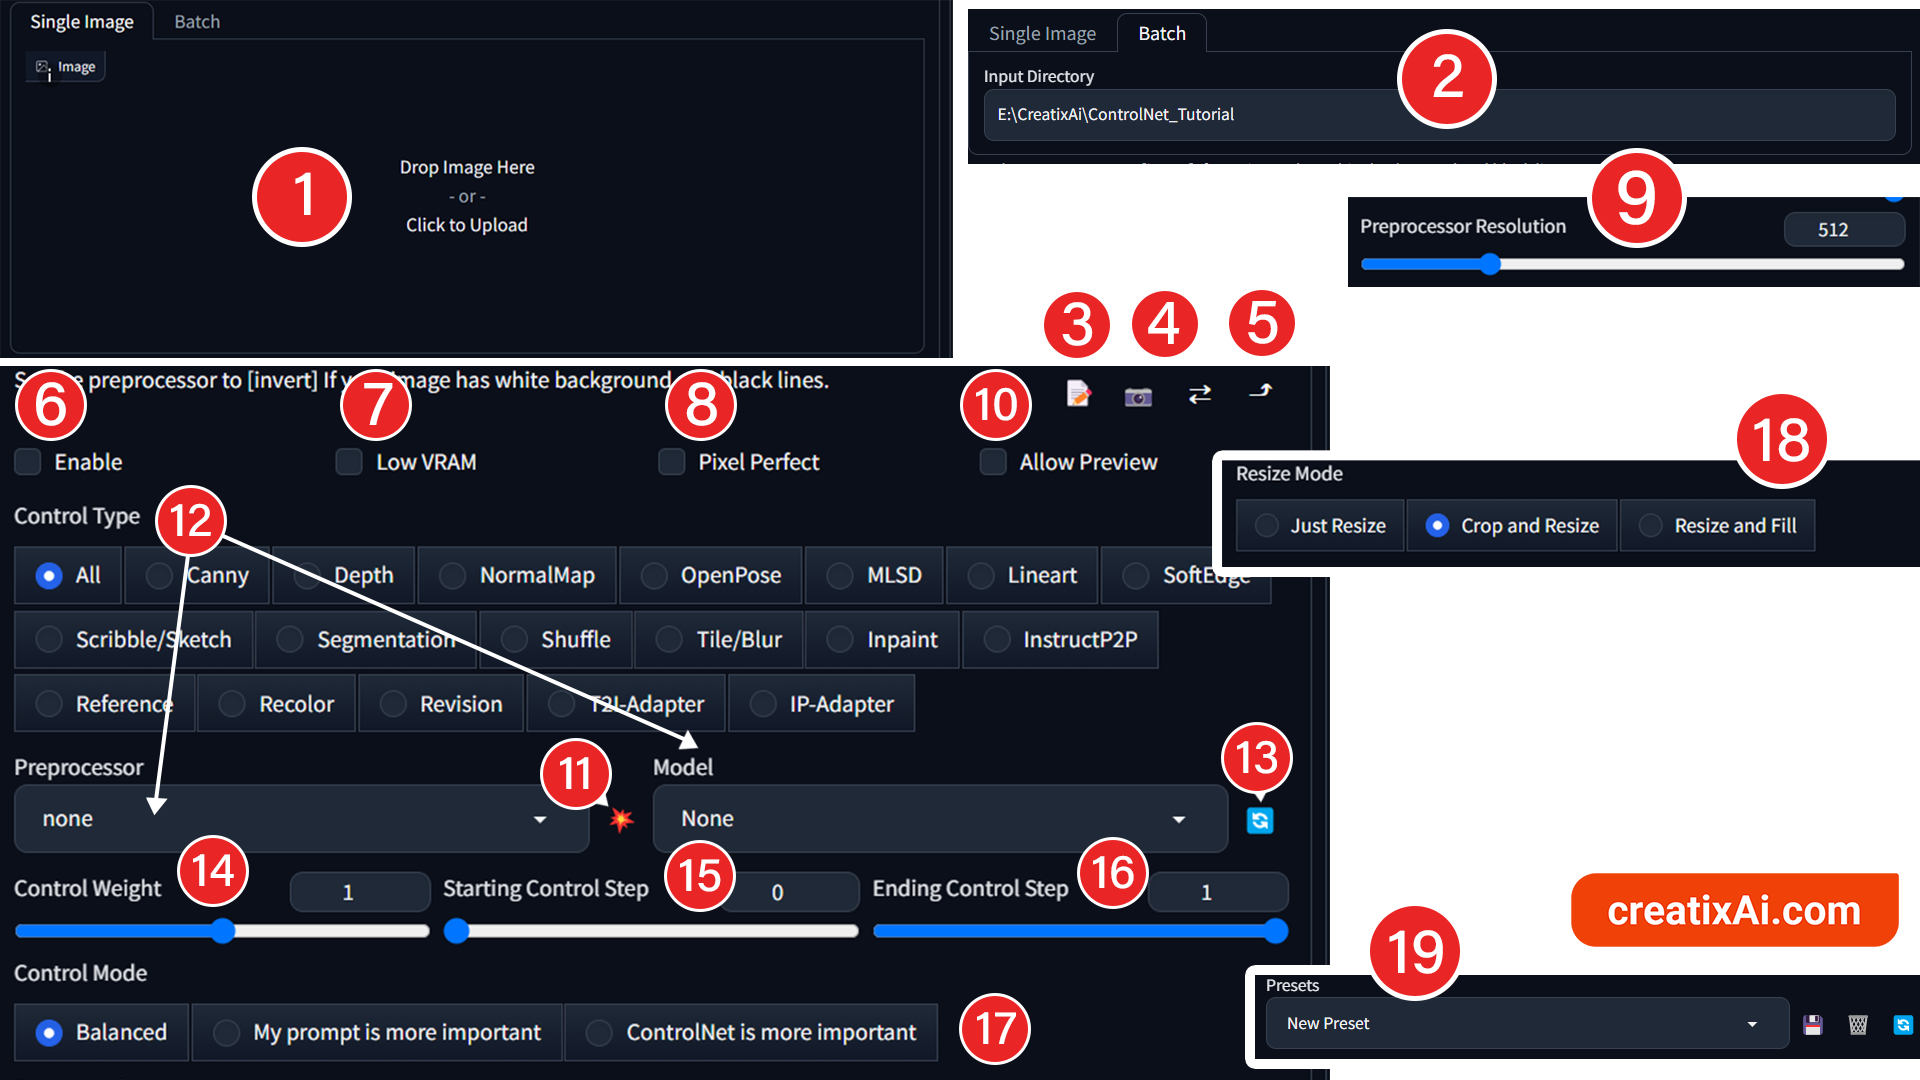
{1) Single image – a place to drop in an image you want to use as a reference image. Hit “X” in the top right to delete the image and choose a new one.
(2) Batch – allows you to specify input directory – a location with multiple reference images you want to run. This helps automate the generation process.
If you have a few reference photos prepared use batching instead of stopping each individual image.
(3) Create New Canvas – the notepad with a pencil icon creates a blank canvas you can draw on and then use as a reference. You can also change the size of the brush, or restart and erase with the symbols in the top right.
(4) Camera – this icon opens up your webcam to take a photo from and then use it as a reference. The two arrows beside it will mirror the webcam.
(5) Up Arrow – this icon will take the resolution of the reference photo and apply it to the Stable Diffusion’s generation settings above so that the two are of the same resolution.
(6) Enable – checkmark to enable ControlNet.
(7) Low VRAM – checking this option allows you to run ControlNet on machines that don’t have a lot of VRAM available.
(8) Pixel Perfect – choosing this option allows ControlNet to decide what is the best Preprocessor Resolution based on the width and height you selected for your new ai-image generation.
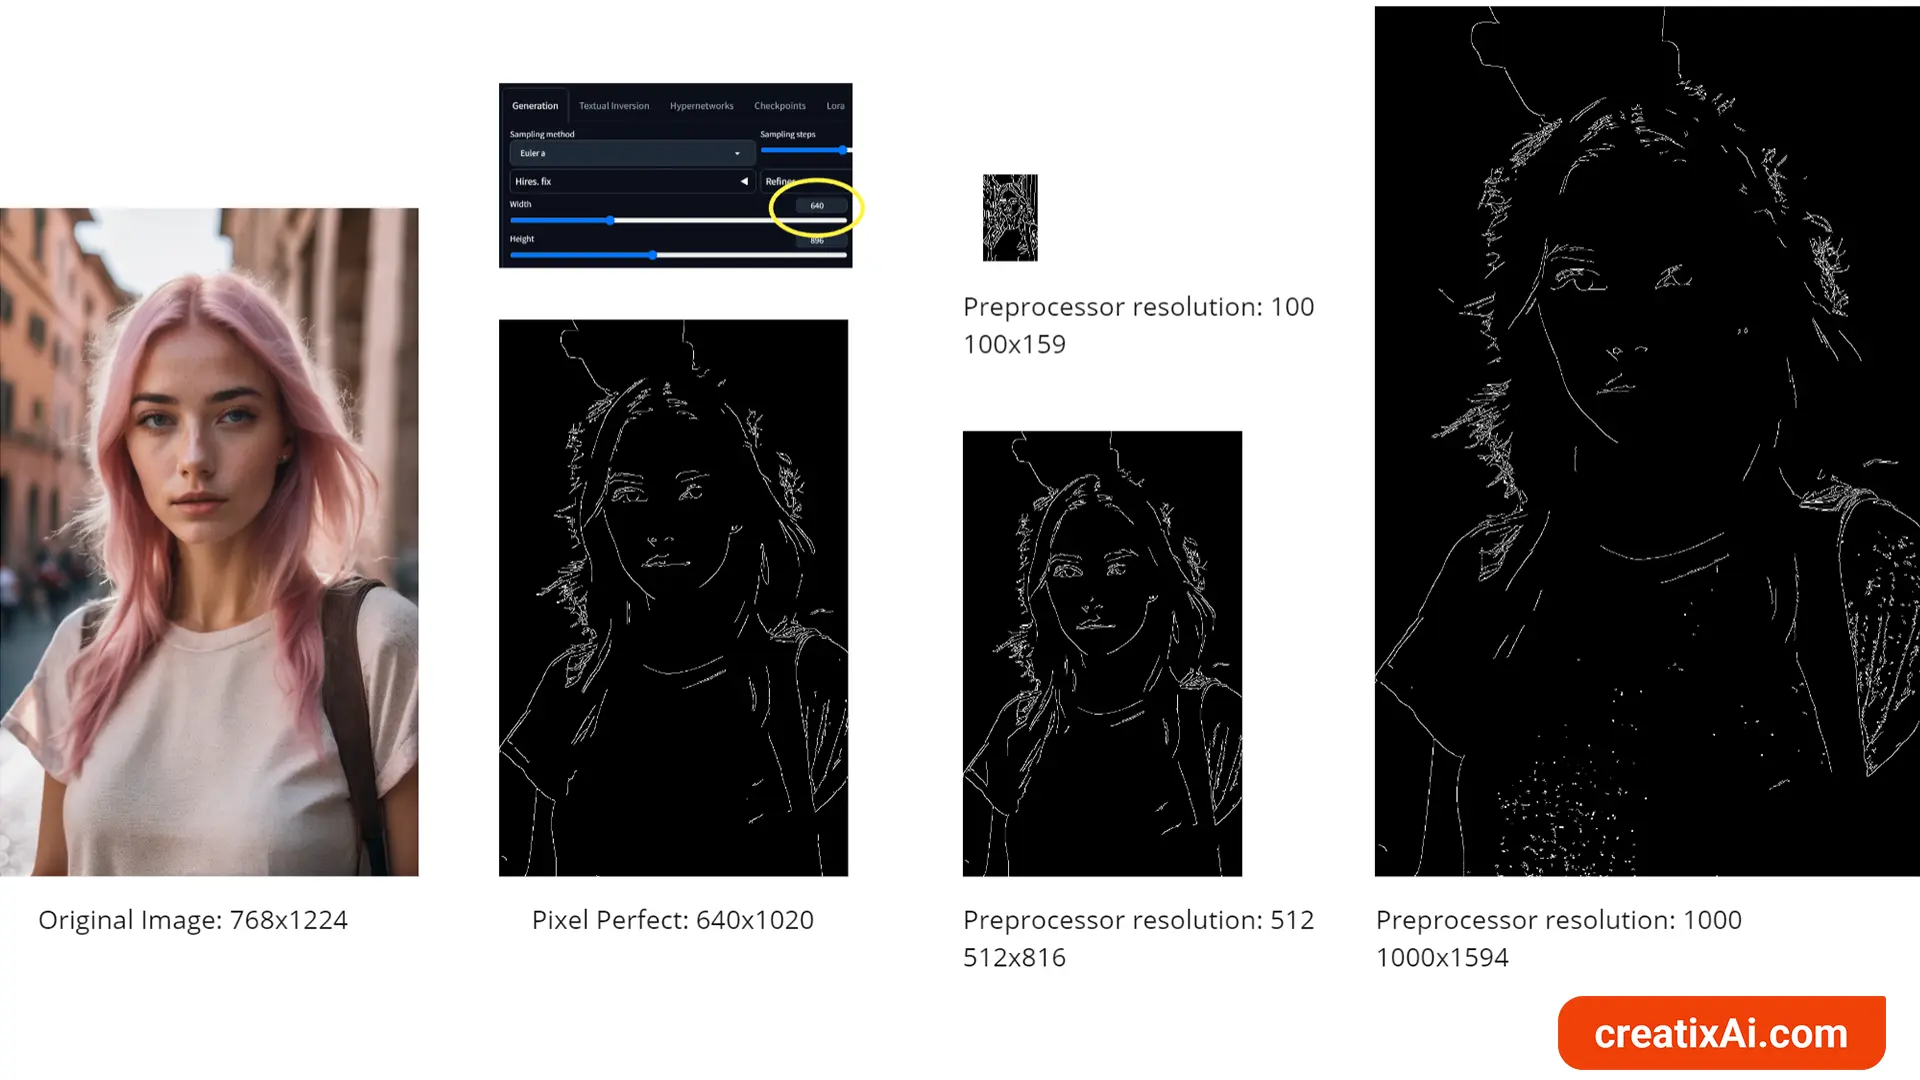
(9) Preprocessor Resolution – determines how detailed the preprocessor is. Lower values produce a more pixelated image; higher values provide more clean and precise results.
It scales the preprocessor output up or down so that its shortest dimension matches the value you selected.
For example, if the original image is 768×1224 pixels, and you set the preprocessor resolution to 100, the output will be 100×159; if you choose 1000, the output will be 1000×1594.
You can play with this setting on your own, or let ControlNet try to get it right for you by enabling Pixel Perfect.
When I enabled Pixel Perfect, with the resolution for my new AI image selected at 640×896, it created an output of 640×1024, once again matching the shortest dimension.
(10) Allow Preview – this will open up a second window beside your reference image that will allow you to preview what each pre-processor looks like for your reference image.
(11) Run Preprocessor – clicking this icon will generate a preprocessor preview for your reference image.
(12) Control Type – selecting “All” will allow you to choose from all available preprocessors and models; you can also filter by a specific type by selecting any other option.
(13) Blue Rotation Icon – click it to refresh the preprocessor and model list if you just pasted new models in the directory and they haven’t shown up yet.
(14) Control Weight – determines the influence of ControlNet in comparison with the prompt you provided. A lower value means that prompt is more important than ControlNet and vice versa.
(15) Starting Control Step – determines at which step ControlNet begins to influence the generation of an image.
(16) Ending Control Step – determines at which step ControlNet stops influencing the generation of an image.
(17) Control Mode – three different control modes affect what influences the final generation more – prompt, ControlNet or balanced.
- Balanced – ControlNet and prompt equally influence the final ai generated image.
- My prompt is more important – the prompt has more influence over the final look of your ai generated image than ControlNet.
- ControlNet is more important – ControlNet has more influence over the final look of your ai generated image than the prompt.
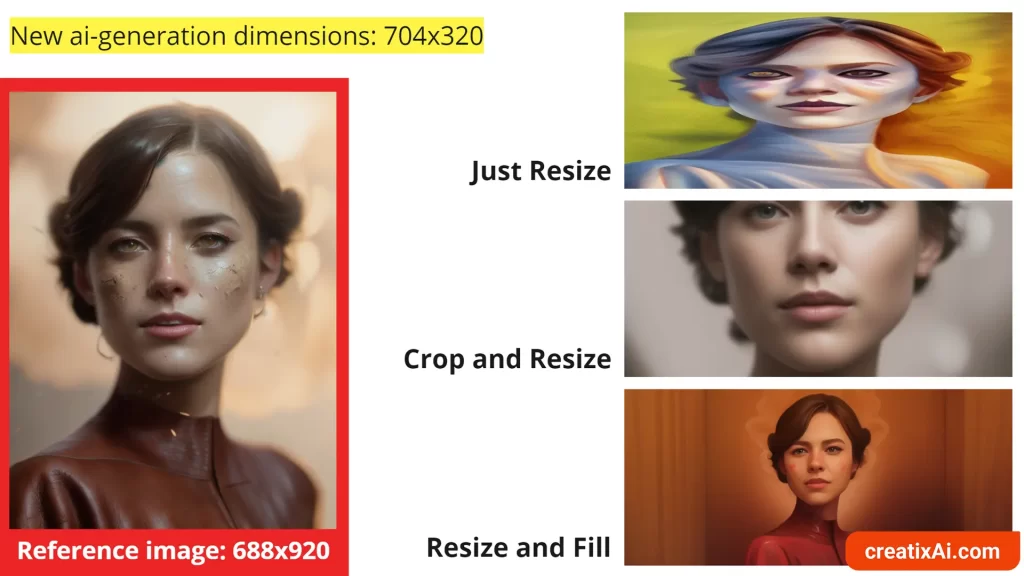
(18) Resize modes – controls how the preprocessor output is applied to the final ai-generation.
- Just Resize – resizes the reference image to fit in the resolution you selected for your ai-generation, even if it means squashing, stretching and distorting the reference image.
- Crop and resize – crops the reference image to fit inside the resolution you selected. This will result in cropping off parts of the reference image, unless it and your resolution above are the same.
- Resize and fill – the reference image will shrink to be fully present within your resolution, and the rest will be filled out by Stable Diffusion. Great for outpainting.
(19) Presets – save your favourite ControlNet settings for various purposes here, so that you can quickly load them for future projects.
ControlNet Preprocessors and Models
There are many ControlNet Preprocessors and models available, with new ones popping up with time.
You should have most of them available already, and if not, refer to the Installation section above for links on where to download them.
The ControlNet extension makes it easy and quick to pick the right preprocessor and model by grouping them together.
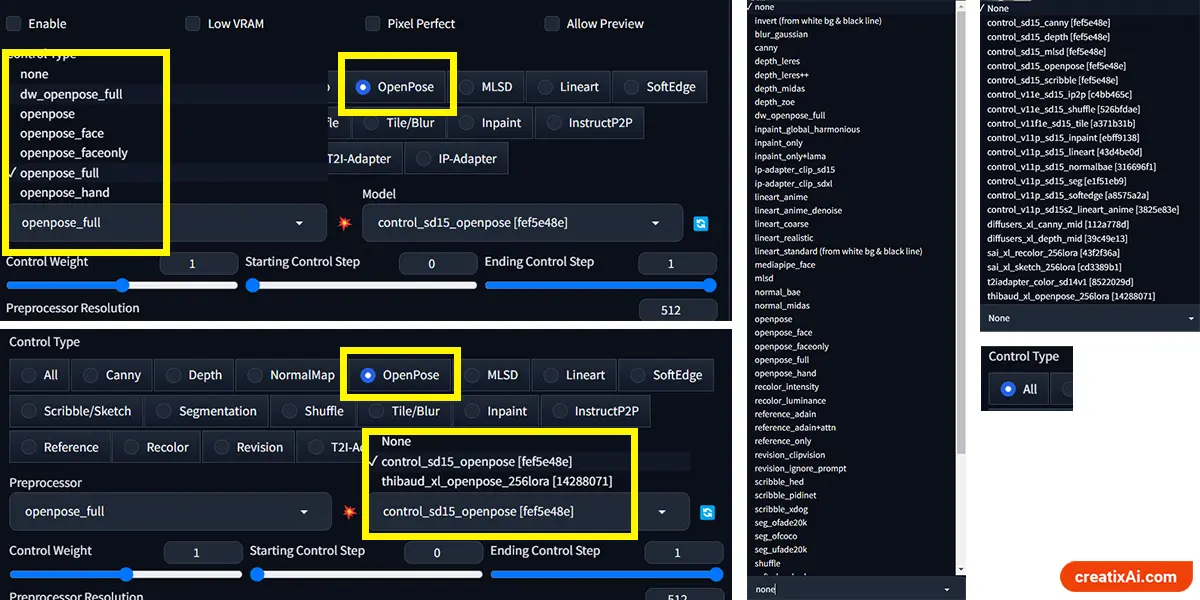
For example, OpenPose – I have 6 OpenPose preprocessors that are easy to choose from after selecting the “OpenPose” tab (in comparison to finding them from “All”).
The same goes for the Model – I can quickly choose between sd15 and xl, depending on what Stable Diffusion checkpoint I use.
You can also use the preview function discussed in the ControlNet Settings section above. I suggest enabling it to test and see what each pre-processor does, and how the preprocessor resolution affects the results.
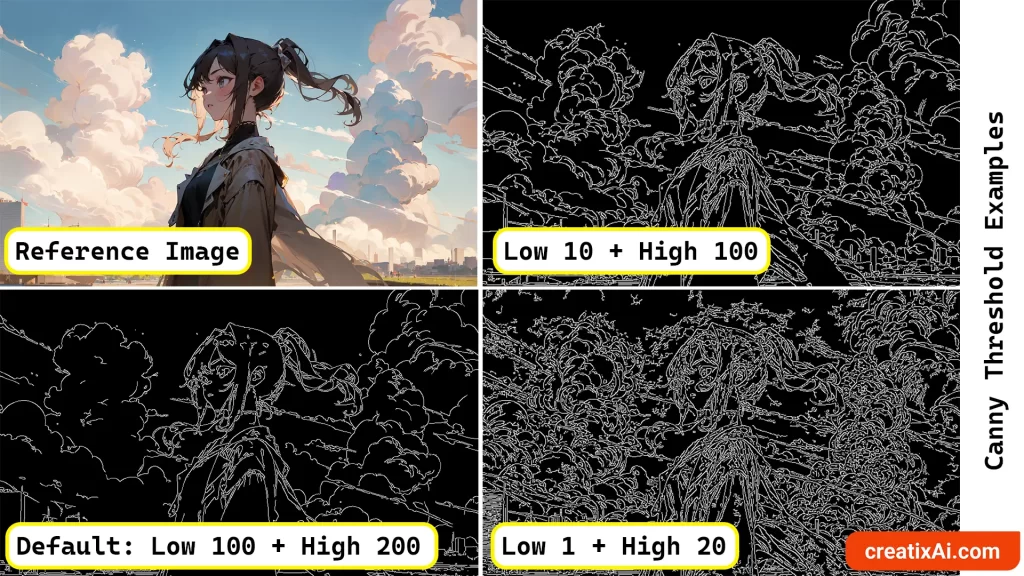
Canny
Canny detects edges and extracts outlines from your reference image.
Canny looks at the image as a whole and will create some outlines for the background as well as the character.
Apart from preprocessor resolution, Canny has 2 additional settings to play with.
- Canny Low Threshold – anything below the number gets discarded.
- Canny High Threshold – anything above the number is always kept.
Values between Low and High are either kept or discarded depending on other mathematical factors.
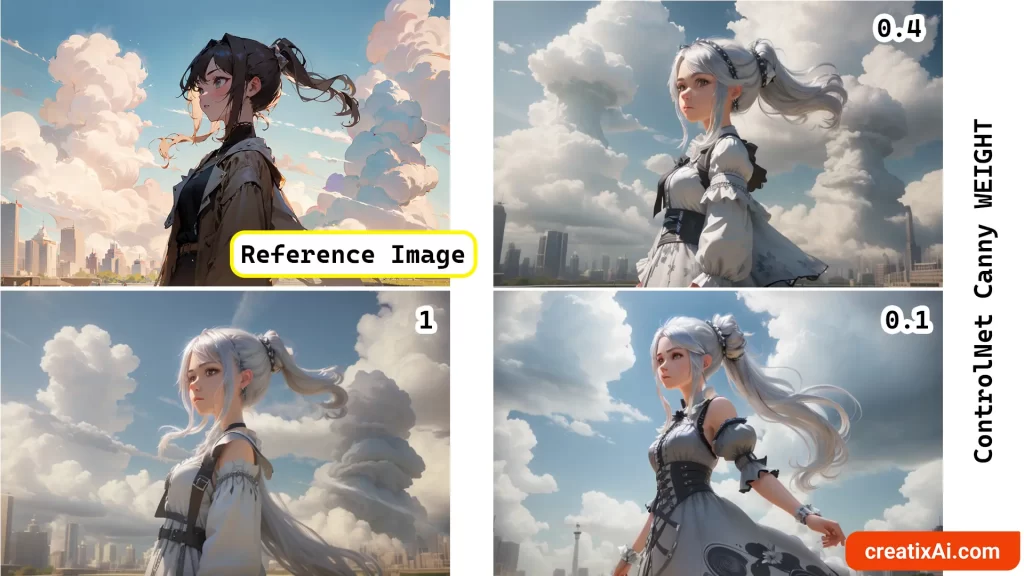
We can also play with the Control Weight to adjust how much ControlNet influences the final output. In this case, I changed the prompt so that the girl has silver hair and is wearing a dress.
We can see how the image changes depending on the weight you choose, with 1 being the strongest influence and 0.1 being almost non-existent.
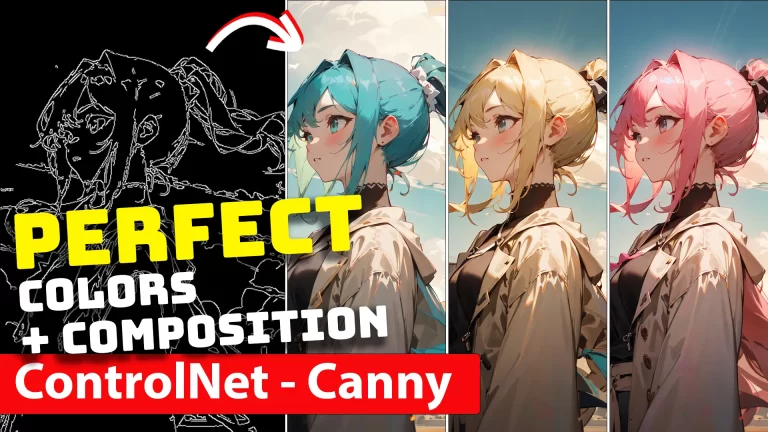
Canny is great for many creative uses including composition.
Check out how different prompts and checkpoints create a totally unique ai-generated image while retaining the overall composition.
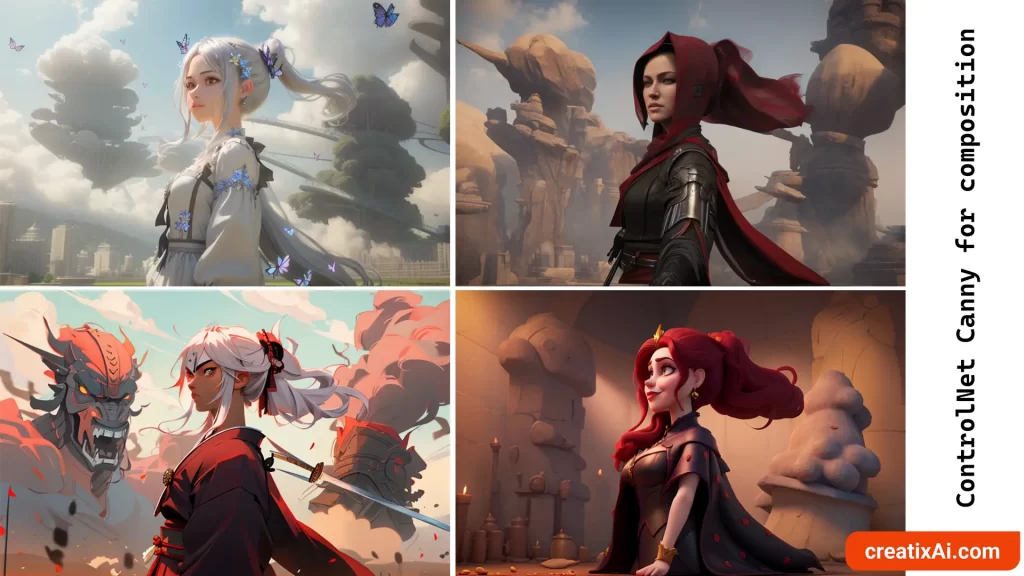
It’s also wonderful for changing certain parts of the image while leaving most other details in place.
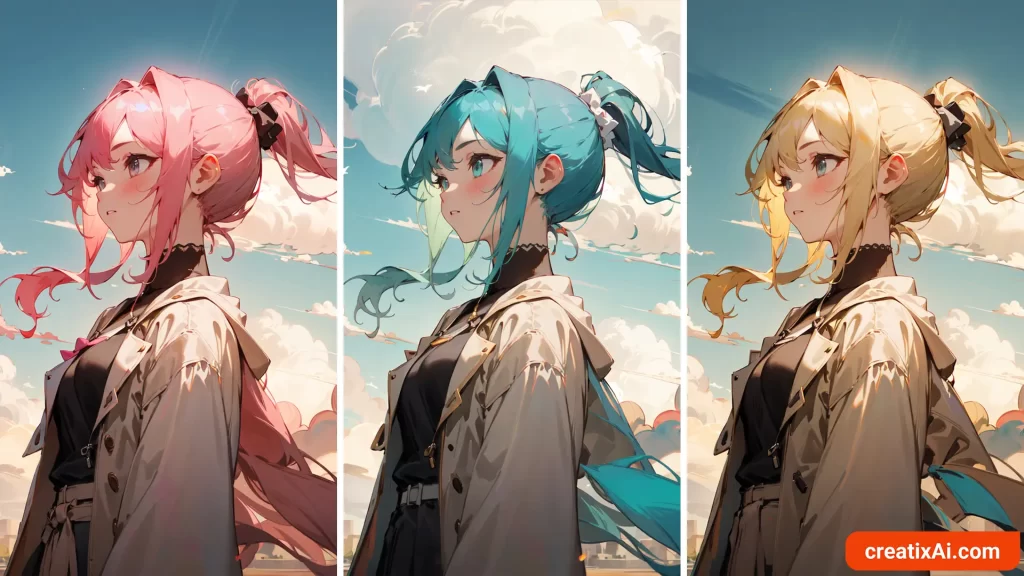
In the example below, I used all of the same settings and the same checkpoint, but added “pink hair,” “turquoise hair,” and “blonde hair.” I love this amount of control.
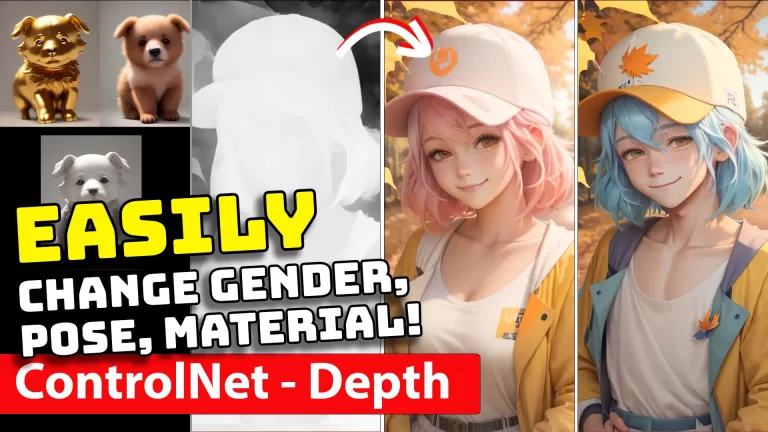
You could also really play with and add plenty of creativity to your image by using img2img and two different images. One for color and one for ControlNet Depth reference.
This often results in interesting colors and vibes, while keeping the original concept and composition intact.

Learn more about ControlNet Canny – an entire article dedicated to this model with more in-depth information and examples.
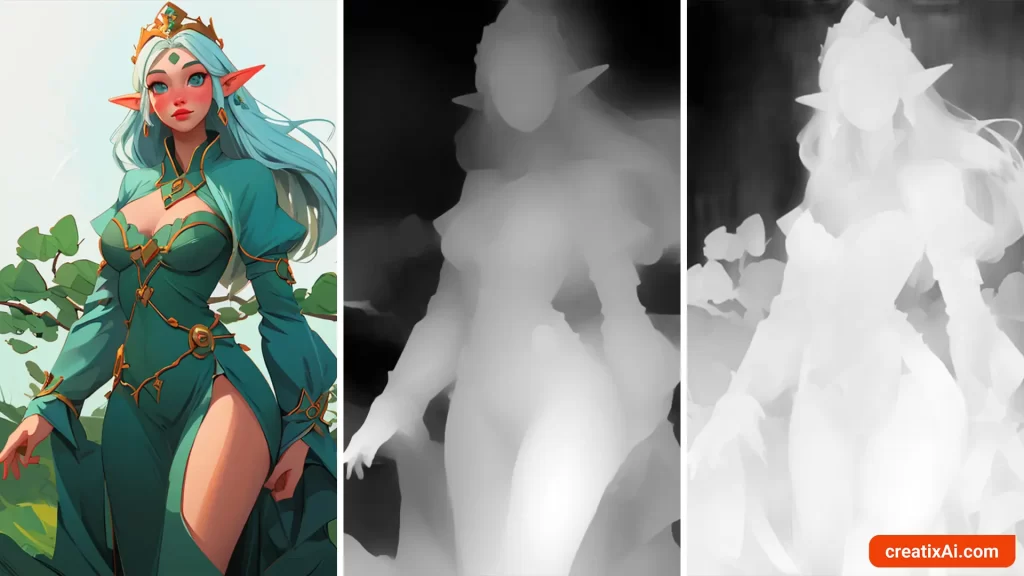
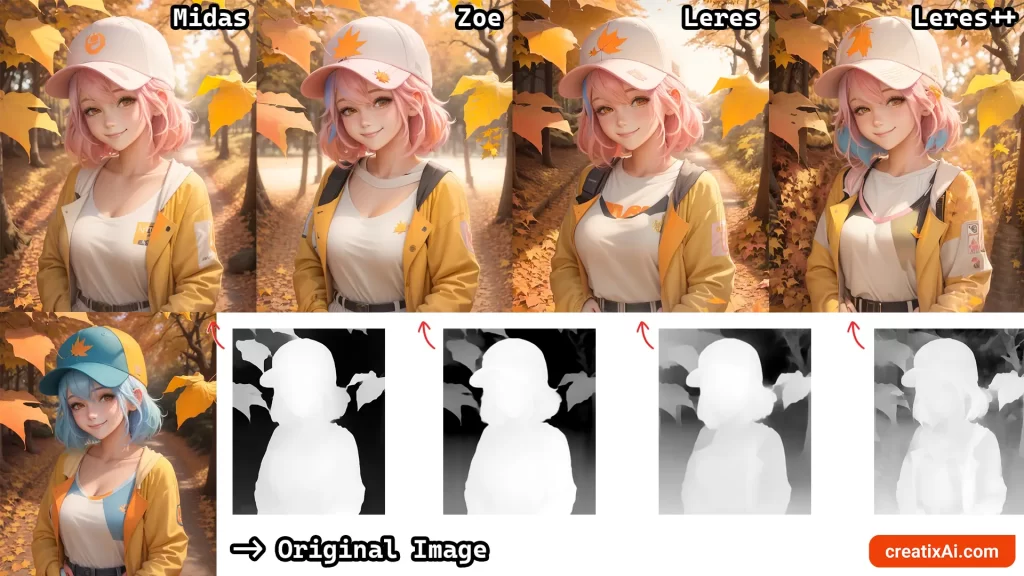
Depth
ControlNet Depth is a preprocessor that estimates a basic depth map from the reference image.
A depth map is a 2D grayscale representation of a 3D scene where each of the pixel’s values corresponds to the distance or depth of objects in the scene from the observer’s viewpoint.
There are four Depth preprocessors available for you to choose from in the dropdown menu.
- Depth Midas is the classic depth estimator that’s used by default with a lower amount of detail.
- Depth Zoe is a preprocessor with a moderate level of detail between Midas and Leres.
- Depth Leres has more details than the other two.
- Depth Leres++ generates the most amount of detail.
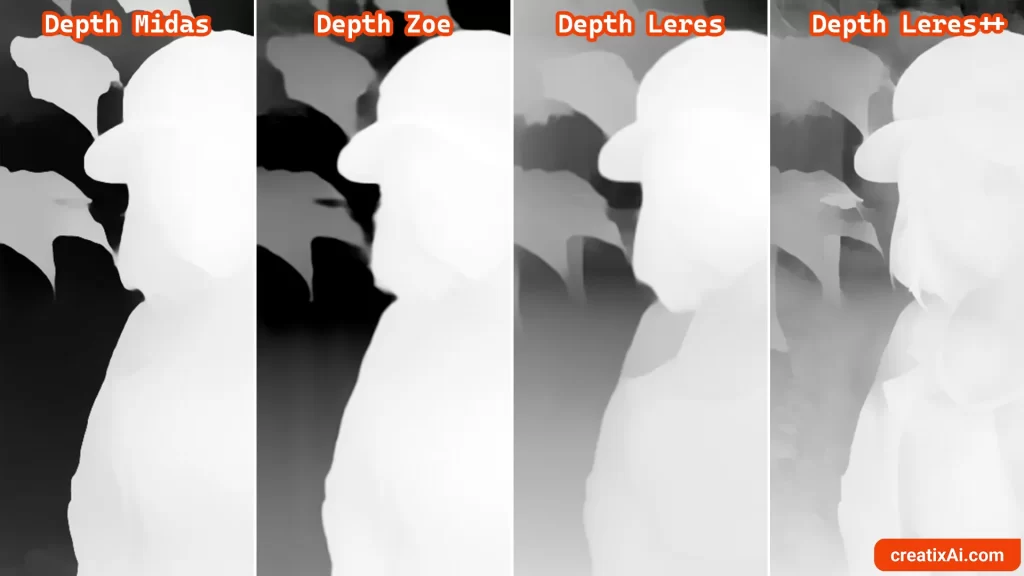
But is having more detail always better? I’m not sure.
You can test it for yourself by running each one separately, as I did in the example below.
In txt2img I generated an image, and then, using all of the same settings and seed, I dropped this image into ControlNet.
But to see what kind of difference it makes, I also changed a few things in the prompt:
- blue hair -> pink hair;
- baseball cap -> white baseball cap.
The result I liked the most was Midas Depth, which is the default preprocessor for ControlNet Depth. But, I can see how you can use this knowledge to affect the amount of details your final ai-generated image has.
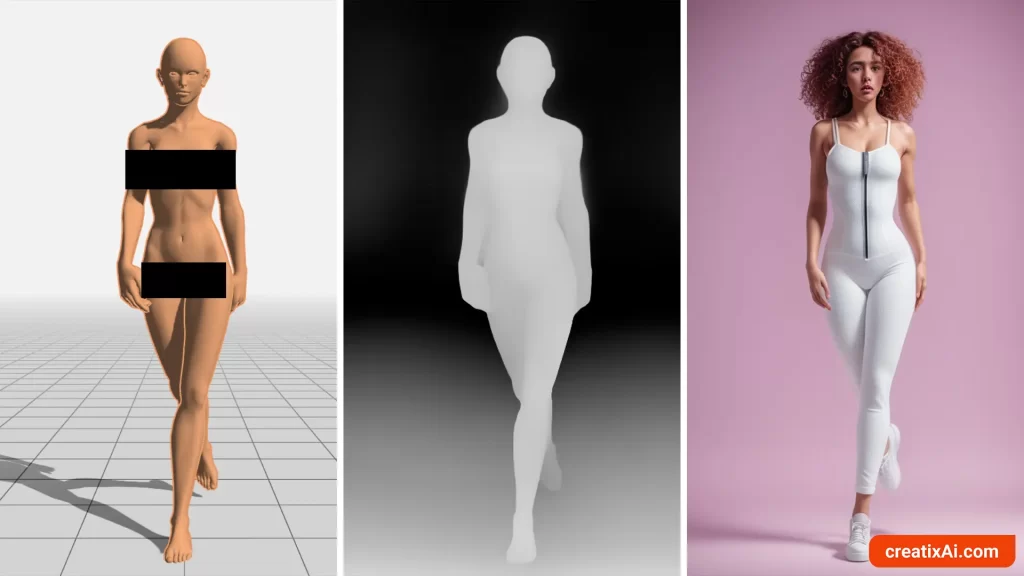
You could also use ControlNet for pose references if you’d like.
In this case, the less information an image has, the better since a depth map is created not only with a person but their surroundings as well.
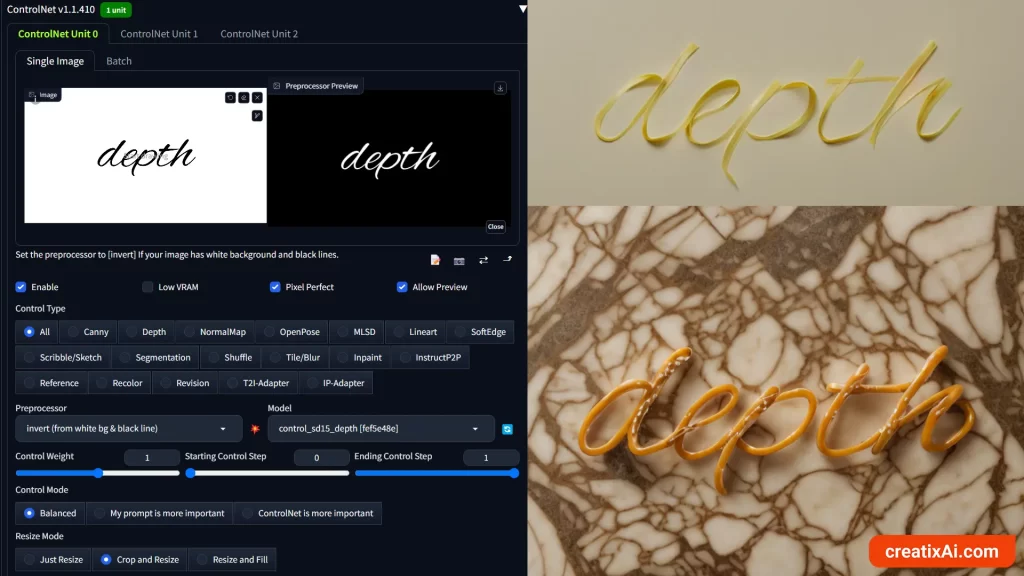
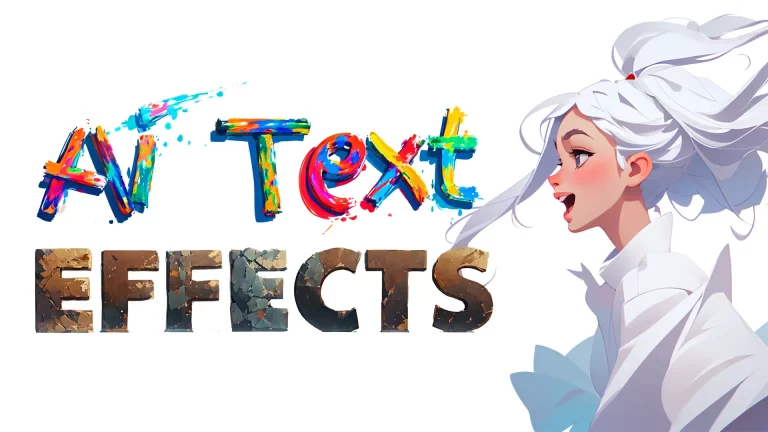
Depth is a powerful preprocessor and model, so you can use it for many other creative uses as well, including text.
That’s right, you can transform the text into spaghetti noodles, pretzels, ice cubes, water, and even bread.
Read my full tutorial on Stable Diffusion AI text Effects with ControlNet in the linked article.
Learn more about ControlNet Depth – an entire article dedicated to this model with more in-depth information and examples.
Normal Map
Normal Map is a ControlNet preprocessor that encodes surface normals, or the directions a surface faces, for each pixel.
Normal Maps is a specialized texture often used in 3D computer graphics to simulate the nuances of depth, bumps, and other surface details.
In Stable Diffusion and ControlNet, we aren’t working with 3D models, but the preprocessor is useful to capture composition and depth within an image, similar to the Depth preprocessor.
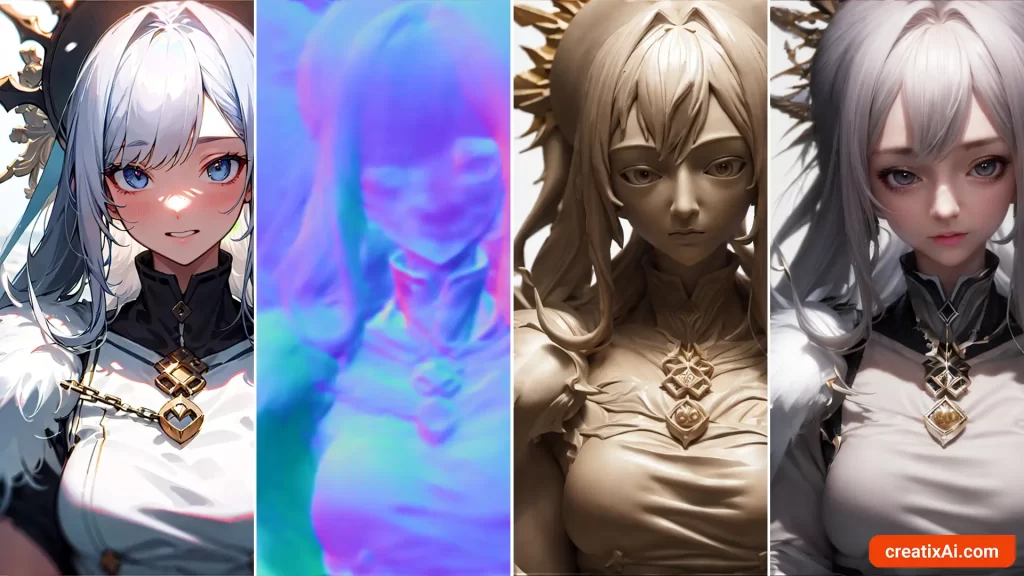
In the preprocessor section of ControlNet Normal Map, you have two different pre-processors: Normal Map Bae and Normal Map Midas.
Normal Map Midas is great at separating foreground, middle ground and background.
Take a look at the examples below of original image, Normal Map Midas and a simple generation using the prompt “painting, illustration, masterpiece, highres“.
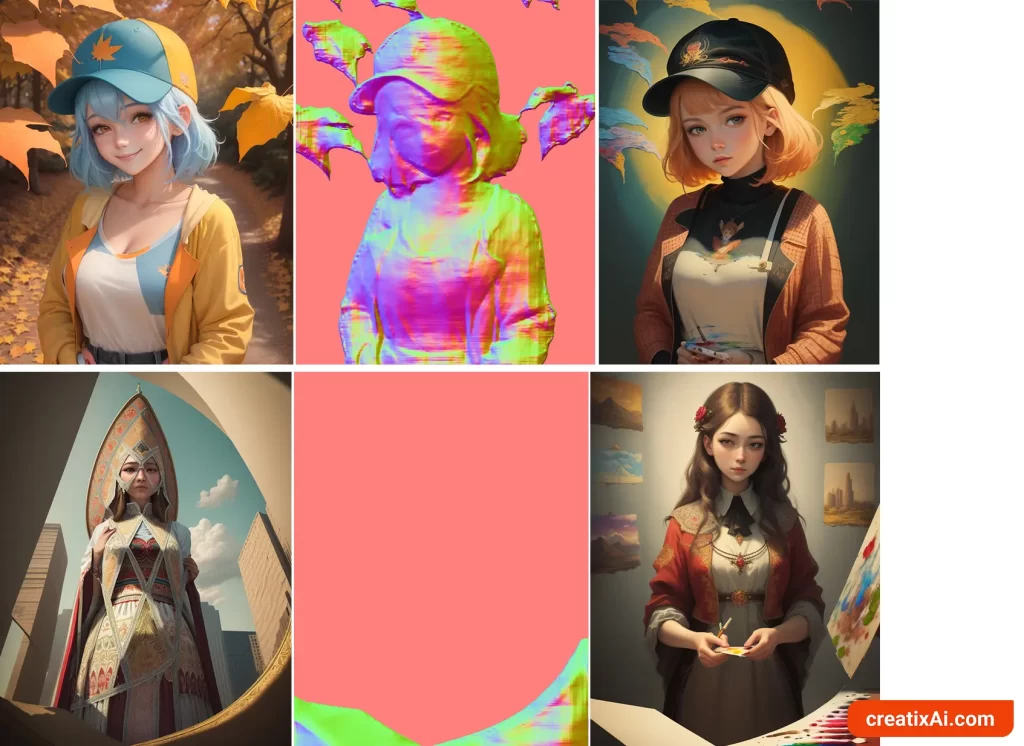
Notice how in the second example, the Normal Map Midas only created a map of the foreground element and based on it created paintings on the left – but the rest was up to Stable Diffusion to fill in.
But we have more control over it.
The examples above were at the default 0.4 Normal Background threshold value.
Normal Background Threshold dictates the point at which distant background elements in a normal map start to fade out or clip out.
With higher values, distant components become less visible, essentially merging with the background, which helps in getting rid of unwanted details. And vice versa.
Now, if we test this setting at different strengths (1a and 1b – 0.02; 2a and 2b – 0.2; 3a and 3b – 0.8), here’s what we get:
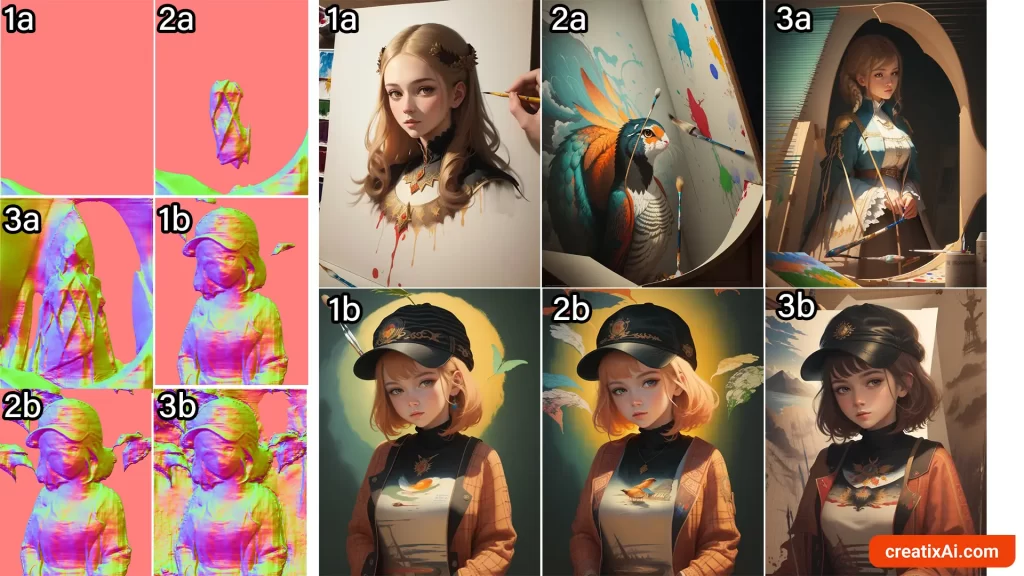
The higher the threshold, the more details are retained in the map and in the final generated image.
Normal Map Bae is great at representing the entire image, with a focus on the sharpest and closest to the camera objects. (IMO)
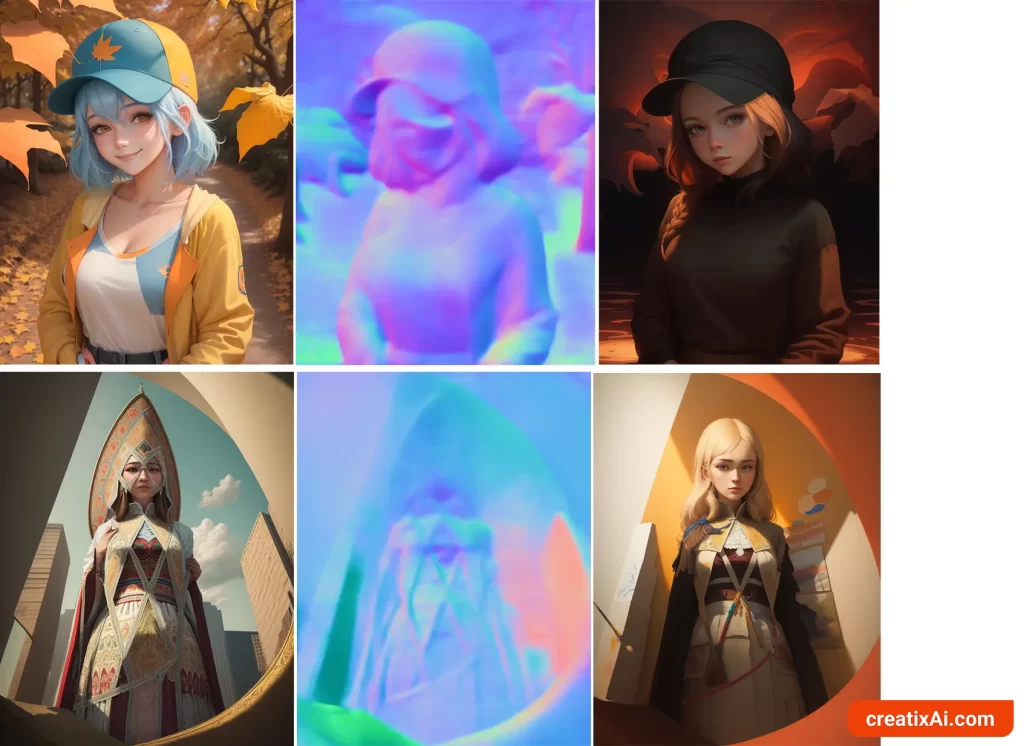
The two maps look entirely different and produce distinct results. You’ll have to play and see which one works best for each unique case.
- WIP: this article is a work in progress. Additional models will be added soon. Stay tuned! 🙂

One Response
I am absolutely impressed by the in-depth knowledge of the creatixai.com articles. This one is another masterpiece of insider artist information.
The knowlege shared here is proof that an amazing artist and highly skilled, extremly passionate and experienced engineer is at work here.
I consider myself a passionate Stable Diffusion user myself from the days one, but I can not absolutely not compete with this author.
I come here very often to get a lesson by reading news and how-tos and reviews.
If I were looking for an artist to create an amazing AI image for me, I would definitively try to hire the createixai author!
Thank you for your amazing lessons, deep inside information and passionate work!