Learn how to Install Kohya locally on Windows with this easy step-by-step guide. It won’t take more than 5 minutes before you can begin training your own models.
What is Kohya_ss ?
Kohya is an open-source project that focuses on stable diffusion-based models for image generation and manipulation. It provides tools and scripts for training and fine-tuning models using techniques like LoRA (Linearly-Refined Accumulative Diffusion) and SDXL (Stable Diffusion with Cross-Lingual training).
Kohya’s GUI (Graphical User Interface) allows users to configure training parameters, generate command-line commands, and train models with ease. The project supports Windows, Linux, and macOS platforms and offers tutorials and documentation for various tasks and features.
You can learn more about Kohya_ss and follow their official installation guide on the project’s Github page:
Continue with this tutorial to read the Kohya installation step-by-step instructions with screenshots.
Installing Kohya on Windows
1. Windows Pre-requirements:
To install the necessary dependencies on a Windows system, follow these steps:
- Install Python 3.10.
- During the installation process, select the option to add Python to the ‘PATH’ environment variable.
- Install Git.
- Install the Visual Studio 2015, 2017, 2019, and 2022 redistributable.
You already have the first two installed if you’ve followed my Stable Diffusion installation tutorial.
The last one is simple to install as well, though might need a computer restart.
2. Installing Kohya on Windows
1. Make a new “Kohya” folder on the hard drive where you want to install it.
2. Click on the folder path, type cmd and hit enter.
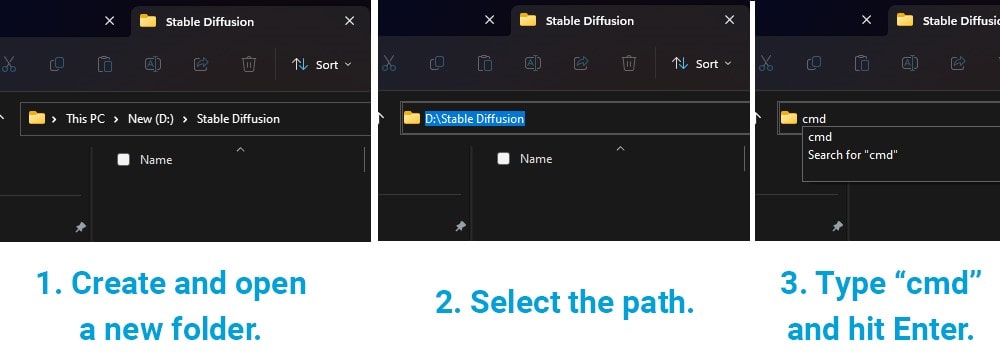
3. To copy Kohya’s repository, paste and run (Enter) the following command:
git clone https://github.com/bmaltais/kohya_ss.git 4. Change into the kohya_ss repository:
cd kohya_ss5. Run the script to set up Kohya:
.\setup.bat
If nothing opened, go to your new “Kohya_ss” folder and open “setup.bat” file.
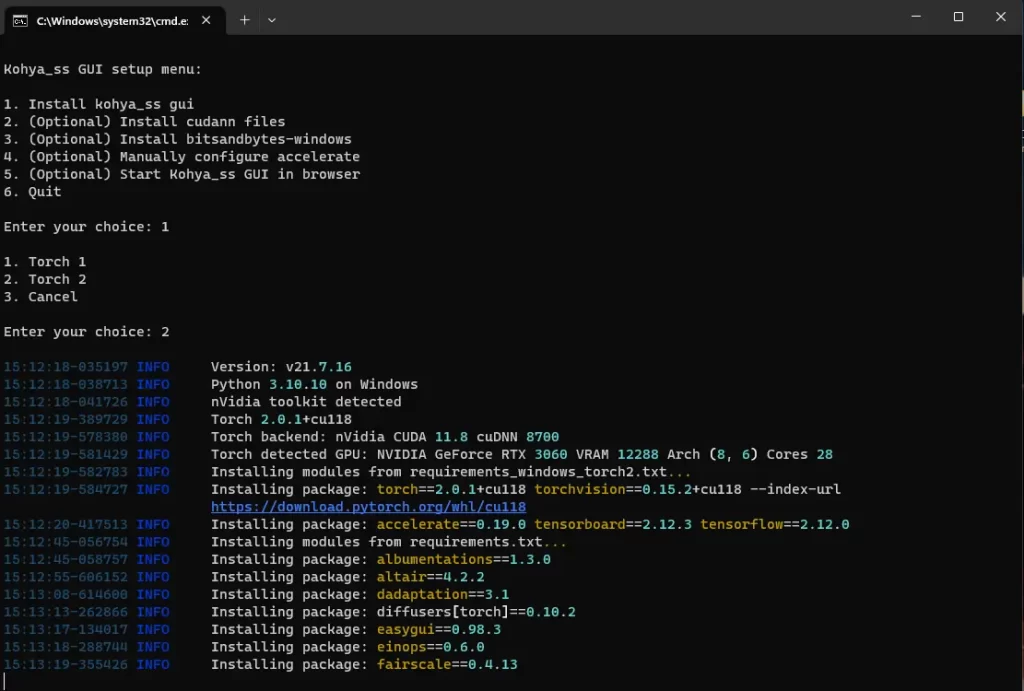
6. Install Kohya_ss GUI by choosing the first option from the menu.
Pick a torch, I chose #2. Then wait for installation.
If it looks like nothing is happening, give it time. It has to download and install certain things before you can run it.
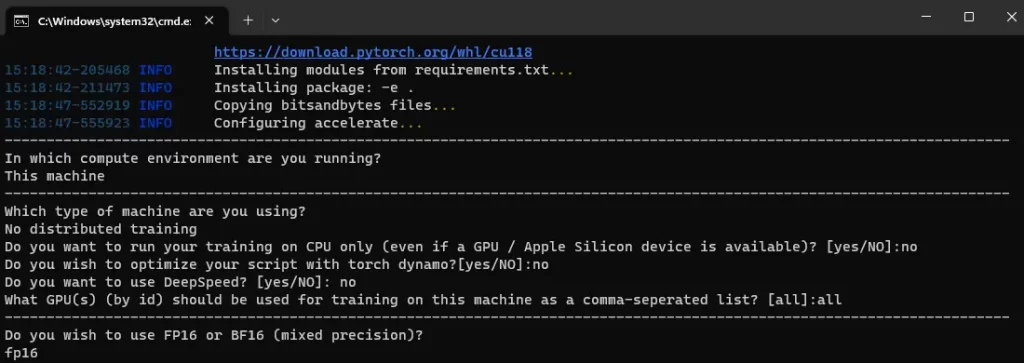
7. Answer setup questions. Here are the answers I picked:
- In which compute environment are you running? — This machine.
- Which type of machine are you using? — No distributed training.
- Do you want to run your training on CPU only (even if a GPU / Apple Silicon Device is available)? [yes/no] — No.
- Do you wish to optimize your script with torch dynamo? [yes/no] — No.
- Do you want to use DeepSeed? [yes/no] — No.
- What GPU(s) (by id) should be used for training on this machine as a comma-separated list? [all] — All.
- Do you wish to use FP16 or BF16 (mixed precision)? — fp16.
For the last question, if you have a GPU Nvidia series of 3XXX or newer, you can pick BF16. When I first installed it, I picked FP16, but I could later use BF16 in my training with no problem.
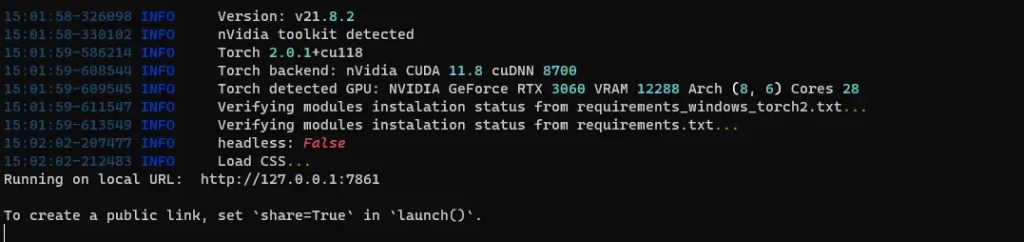
8. Pick option #5 to run Kohya_ss GUI in the browser to get started.
A new cmd window should open. Now you can copy the local URL link and paste it into your browser to run Kohya and begin training your own models!
Boost Sample Generation Speed
Update: no longer recommended unless absolutely necessary.
Optional: Install CUDNN 8.6
If you are running one of the NVIDIA 30X0/40X0 GPUs, you can install CUDNN 8.6 to boost sample generation speed up to 50% and enable larger training batch sizes.
This will require you to download and install CUDNN 8.6. Here’s the mega link for CUDNN 8.6 download: https://github.com/bmaltais/python-library/raw/main/cudnn_windows.zip
You can also find the link to it on the GitHub page mentioned at the beginning of this article.
When the download is finished:
- Unzip the file and place the folder “cudnn_windows” in the root directory of the “kohya_ss” folder.
- Run the “.\setup.bat” file from the “kohya_ss” folder and select the option to install Cudann.
And you are all done!
Upgrading Kohya_ss
If there is a new version of Kohya and you want to upgrade to it, follow these steps:
- Open the root directory of this project.
- Open the “kohya_ss” folder. Select its path, type “cmd” and hit Enter.
- Pull the latest changes from the repository by running the git pull command;
git pull- Run the setup script:
.\setup.batAnd you are all done!
How to Install Kohya Video Tutorials
I made a video tutorial on how to install Kohya and use it to train LORAs locally.
Check it out:
Hope you found it easy to follow this Kohya installation tutorial.
New Kohya training Lora tutorial coming soon!